Friday, January 30, 2009

Argh. Still fixing the squeaky tub.

So this time I went through the hallway.

Used a stud finder, measured for the hallway trim, cut away the drywall and what did I find?

A whole mess of plaster stuff.


Yes, it seems that our plumber really
laid in the durabond nice & thick around the outside of the tub after it was installed, which is of course why it doesn't creak around the outside rim of the tub, just inside that rim.

I thought I could chip away at the mortared in rim, but I had even less room to maneuver than from the closet.

We just couldn't chip through it.

The the DH has a flash of brilliance. Remember the speaker installation? Well HE did. The second speaker we cut into the ceiling was a bummer because we ran into the plumbing. The plumbing for the... wait for it... yes! The Bathtub.

Hell, we already had a hole cut and everything.

So we took the speaker back down, poked and prodded with a wire coat hanger and made sure we had enough room to poke some foam in there. It looked good, so I made a similar 'apparatus' and taped the clear tube to the wire hanger, stuck both into the hole, and then attached the can of foam. (*This time we used uber-expanding foam just in case.)

That white plastic thing behind the PVC (with the fins) is the bottom of the tub.

I stuck the tube and the wire all the way in and basically let it empty itself. When I thought the can was about 1/4 full, I started pulling the tube out of the hole.

The thought is this: if it over expands, it will run out of the sides and towards the edges of the surround, and there's lots of space under the tub wall that faces into the bathroom (the side that you step over to get into the tub.) At least that's the plan....


I'll let you know how it goes after it cures overnight.

Squeaky tub solution: part two.

I checked the underside of the tub this morning, and the foam has solidified. I was a little concerned about this, as the foam came out of the tube last night was oddly very liquidish. I think forcing it through the tube changed the composition and the normal immediate exposure to air. I think it took a bit longer than normal to solidify, and I don't think it rose as much as I would normally expect it to.


But the real test is the squish test.


Looks like I'll be doing a part three through the drywall in the hallway. At least this time I don't think I'll need the long tube apparatus. It only seems to squeak towards the drain and I'm guessing I just didn't give the foam enough time to build up under that area. I said before, it came out very very slowly and I was working blind.

But it's a good start, and much much better than it was before.

Off to Home Depot!!!!

Thursday, January 29, 2009

Squeaky tub solution: part one

Hopefully there won't be a part two, but I've learned a thing or two about optimism: It's doesn't help one iota when working on a project like this. In fact, it's usually detrimental.

I can't count the number of times we used the words, "Well, this should be the last of it" or, "This is the last trip we'll need to make to Home Depot today..." As soon as you say those words, you're done for. We really try not to say things like that anymore. It's just bad luck.

So anyway, back to the squeaky tub.

I decided to go in to the wall opposite the plumbing, which is conveniently in our bedroom closet. We'll be covering over the hole with 7 1/4 trim, so I made sure not to cut the hole too high.

(I also checked for studs with a studfinder.)


Once the hole was cut, I took a peek inside. Seems that the plumber used some Durabond mix to prop up this end of the tub. That would need to come out with a few whacks from a hammer.

And it means I had to double the size of the hole. No problem.


Once I got to whacking away at the plaster, I realized why it was there. Apparently one of the small legs on this end of the tub had broken off. I don't think that contributed much to the squeakiness, but it did need to be re-supported.

I also noted that the underside was mainly clear of obstruction, and I took my 4' stick (actually a reflector stick for marking driveways or something like that) and poked around to make

sure I could get it in later with the apparatus attached.


"What apparatus?", you ask.
Lemme tell you:

1 can of Great Stuff.
5 feet of 1/4 clear tubing from the plumbing dept.
Electrical tape
stick and a flashlight

I pushed the tubing over top of the nozzle for the Great Stuff about an inch, then taped over the end to keep it from slipping off. Then I taped the end of the tube to the stick and wrapped it a few times in different places to hold it on.

Then I stuck the whole shebang as far in as I could go under the tub, then attached the can and let her go.

It came out S...l...o...w...l...y.

I let it seep out and about every 30 seconds, pulled it back towards me about 2"-3" and just let the can empty itself out under the tub.

Since I was completely blind as to how much was being deposited under the tub, I have no idea if this worked. The only way to know is to let it cure overnight and pop on into it in the AM and check for squeaks.

If it still squeaks, we can cut into the surround via the hallway outside the bathroom and try again.

We're putting up trim there too.

Wednesday, January 28, 2009

Squeaky tub problem

OK, I love the new tile surround, but I absolutely hate the squeaky-squeaky of the tub floor. As I re-read the installation instructions from Sterling, it specifically says to install it in a wet concrete base and let it cure.

Well, for us there is no concrete base. Our plumber must have forgotten that part.

Here's what we have to deal with:


We plan on fixing it with a hole saw, a can of Great Stuff, a long plastic tube and a stick.

Oh yes, there will be pictures.

I'm sharing this with the Hooked On Houses crew. They've always got fun stuff going on. Make sure you check the main page of RehabOrDie to see "The Solution" and "Part II" to this problem.

Guess which branch will fall next -- Win free lumber!!!


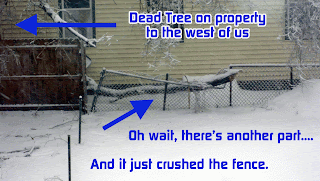
Here's a compilation of the menaces in my neighbor's yard(s).

As you can see, most of the branches from the tree closest to our house (on the west fence) has already been heavily cut back since Hurricane Ike hit and downed most of the branches in our yard.

The tree behind it, on the North side of the yard, landed most of its branches on top of the yellow house, but there's still more to go.

We're still hearing creaking out there.

So here's the contest... pick which branch goes next and win a pre-cut and stacked pile of lumber from the last fiasco.

Pick your color branch, or pick your own.

Good luck!

And d$%# it all... another branch fell in the backyard.

Sonofa&*%#@!

Just when I thought we were done with the trees falling into the back yard, whammo.
(See previous posts here, here and, here)

Who knew?

Snow and ice built up on a DEAD tree and they tend to fall down, ya know? Oh, wait... I knew.


That's why I suggested to our absentee homeowner neighbor with the deadish tree in her backyard that keeps dropping branches into ours that while she had the tree trimmers cutting the DEAD TREE off of her OTHER property (yellow house at the end of our back yard) from the LAST time the DEAD TREE fell into pieces.. that she take the whole tree down.

Nope. She didn't want to pay for it. Everything that *looked* alive on the DEAD TREE was to stay. Foot on ground. Unmovable force.

This morning at 7:15 Am, I heard a loud crack.

I took these pictures.

Another one bites the dust.

I have never been so thankful for not having put up our new wooden fence yet.

Mechanical things that are doomed to fail.

The puck light on the new stove hood vent just went out.

Considering it's only a month old, I'd have thought it would last just a liiiitle bit longer.

Alas it was not to be.

OK, those little halogen lightbulbs can be tricky and if they were installed with a bare hand (oils getting on the bulb GREATLY reduce the lifespan of a bulb) then, well... there you go.


Um... but what's this?

That doesn't look good. In fact, it looks like a short.

btw: if anyone knows where to get this replacement part (or what the heck it's even *called*, please let me know.)


After a little prodding and pulling, I was able to read the label on the "Quartz Lamp Holder". It says, and I quote.....

" * The lamps are couldn't straightly fixing on the surface of combustible material."

Um, yeah.

Doomed.

Monday, January 26, 2009

Finished sealing the grout and tiles

First of all, I wanted to back up a bit and discuss the grout. We used 1 1/2 bags of grout. We had less, which of course led to an emergency run to HD mid-day.

One of the tricks I'd been told over and over again was to not do the grout over two different days. You're supposed to grout everything in one sitting because it's just too hard to feather wet grout into dry grout, and it makes for a weak spot in the seal.

Secondly, to avoid getting grout all over the white paint around the surround, I used blue painter's tape to protect the walls.

This worked out great, except for the top back wall of the tub where the grout sealed in the tape. I had to use tweezers to pull out the tape the next day after the grout dried. Since I can barely reach the top of the tub as is, that was a real pain in the @ss. I guess I'd recommend pulling the tape while the grout was still semi-damp.

I mixed the grout until it was a peanut-butter texture and rubbed the grout into the joints. This was hard work, and really rough on the hands. I highly recommend the use of gloves. Any gloves. The grout dried out my skin afterwards and needed some serious moisturizing to prevent cracking.

The big blister between the middle and pointer fingers didn't help much either. Nor the scrapes on my knuckles. This one was rough on the hands.

Once the grout was in, it needed wiping down with a soft wet sponge. Many many times. After six or seven wipedowns, I still needed more. As soon as the water would dry on the face of the tiles, I'd begin to see haze.

Time for another sponge bath! After ten times, carefully cleaning the sponge after EACH pass, I was satisfied it was done enough and let it dry for 3 days before starting to seal it.


But now the sealing process is over. Yes, it is finally done.

It took two applications. In both cases I started at the top of the shower surround and worked my way down. I used an empty plastic cottage cheese container to hold the sealer and a regular paint brush. ( I was going to go foam, but didn't find one in time.)

The first application I started off very carefully dipping the brush into the grout sealer (a clear thin liquid sealer) and applying first to the grout until it was soaked in and changed the color darker. Then I went back and made sure the tiles were covered over. I focused on two rows at a time, making sure I had complete coverage before moving on to the next lower rows.

The mixture is very water-like, and I had to constantly catch drips. At the end of the day I had to wash out the tub with soap and water to get the sealer off. I don't know if it would do any damage, but why take chances... (i.e. no, I still haven't gotten all of the mastic off of the floor yet.. it's really ground in. Ugh.)

Once the first coat was on, the instructions said to wipe off any excess. There wasn't any. Those tiles are like little sponges.

VERY IMPORTANT NOTE: When using travertine marble (I'm not sure about other types, but this warning came in clear from the king of coasters himself about these.) DO NOT USE RED MAGIC MARKERS ON THE BACKS. Black markers are apparently ok, but the red ones.... the red ink WILL seep through. He said he had to redo an entire installation a month after installment because they used red markers on the back to assemble a layout, and lo and behold.... the porous nature of the marble brought that red ink right on through to the front. Not good.

So anyway, after the first coat, I decided to wait a day. When I came back to it, everything was dry and pale again. So the sealer really didn't darken the tile or the grout permanently. Not even for a day.

The second application went a lot quicker. Mainly because I gave up the plastic container and poured the rest of the sealant into a spray bottle and went to town. Muuuch quicker. Still, I had drips, but I was able to catch them easily with the paint brush. I think I may have used more sealer than I did on the first run, but that's ok. Still, after 20 minutes on the second coat, there wasn't much excess to wipe off, so I took an old T-shirt and wiped the tiles down well.

btw: Just a tid-bit of a suggestion to those who will be building their own bathtub area from scratch... not just tiling it, but building it. They do come hand-in-hand, especially if you're the one who is going to be tiling/painting/whatever: Don't make the surround any taller than you can reach diagonally while standing on the outside rim of your tub. I am 5'5" and I almost couldn't reach the corners of my tub for mastic, grout or sealant. I DID NOT pay attention to my reach when planning out the height of the tub. If you're doing a project like this alone, you should seriously take the height of the shower into consideration. Me? I just got lucky. I almost slipped a couple of times and had some sore arms trying to position a 3-1/2" triangle of marble tile on the mastic perfectly at the top of the tub, but I would do it differently (3-4" lower) if I had to do it over again.

After I'd given the second coat of sealant a good 12 hours to soak, it was time to caulk. I used white silicone caulk all around the top (Ugh... another pain in the arse getting it smoothed out while 'on point' at the edge of the tub rim... can you say 'leg cramp'?) and the bottom and a small run on the outsides as it edged up to the painted wall.

Side note: on our upstairs tub we've already noticed some moisture on the wall next to the sides of the tub enclosure. It's getting that 'moisture wrinkle' from long hot showers. We'll be painting that area (as well as in the master bath, learning from the mistakes of the other tub) a water-resistant semi-gloss ASAP.

After caulking on the shower head flange and the water flow knob... I took the new shower-massage-adjustable-head for a spin and doused the opposite wall down with water.

The water beaded up perfectly. Yeah!

I admit it. I am and have been a fan of Sci-Fi for decades.

It started with Star Trek. Of course. I ALWAYS wanted a pair of those high leather gogo boots the chicks wore. (before I go any further, I really should explain that the author here is The Wife, not the Dear Husband, lest a few of you get some odd ideas.)

Then came Logan's Run and Battlestar Gallactica in the mid 70's. I used to watch them on TV on a screen no bigger than my computer monitor is now, only back then it had a wire hanger sticking out of the top, no remote control, and we only got 4 channels, 5 on a clear day. Oh and it was black-and-white.

And the Bionic Man,... and the bionic woman... and oh yeah, what the hell was a bionic dog good for? Oh Puhleeze.

Anyway, then came Star Wars.

I remember waiting in line at the local theatre. The line went down the block. And around the back. And then another block. I was impressed at the attention beforehand.

I was in awe afterwards.

I bought the legos. I bought the action figures (yeah, they were dolls, guys, get over it.) I bought a flashlight light saber. I bought Luke Sywalker's floating red hovercar and was duly upset when I realized it had wheels.

Flash forward thirty years..... not only has IV,V and V been watched a hundred times, but I, II, and III has been doted on as well. I own all six DVD's with bonus material.

Just last night, I brought out the original and popped it in the player.

But something was different this time.

Did something CHANGE?

Yes We Did.


Look closely.
(or click)

Monday, January 19, 2009

Wow-

OK, DW posted on finishing up the tile in the surround a couple days ago.

Now, it wasn't quite FINISHED as it still needed grout and sealing, but I thought it looked really good.


Well, yesterday, DW hit it with grout. That makes things look much more finished. The quality of the job comes through more clearly, too. Pretty darned good for a first time at doing a tub surround. Frankly, I've seen professional jobs that didn't look as good. I'm extremely proud of DW's tile work.

But here's the thing. After wiping down the tiles, most of that mortar comes off. Then, today, I wiped off the last bit of remaining dust.


WOW!


The marble is beautiful! I mean EYE POPPING pretty.

I don't have a shot of it yet, but as soon as DW seals it (unless she lets me do it), we'll do some close up shots. If you can source your tumbled marble tile at a price, I would highly recommend doing this project (though I'd make sure you've got your tiling skills down pat first). It's transformational.

Wow, again.

This week, I'm hooked on my wife's tile job, and I'm going to be trying to get her some of that jewlery over on Hooked on Houses. It's mighty cool for the DIY set.

Sunday, January 18, 2009

One Year Ago, Today

I remember impatiently waiting for our demo guy to finally get done.

http://www.rehabordie.com/2008/01/almost-completed-demolition.html


This was the start of getting over budget and under the gun.

It helps sometimes to look back at how far we've come. Then again, sometimes I look at it and I get a little bit sick to my stomach. That was a lot of work...

Saturday, January 17, 2009

Installing ceiling speakers


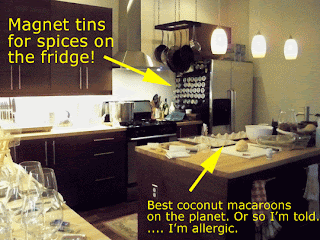
We knew from the beginning that we wanted to wire the house for speakers. We planned it almost from the beginning, and made sure that each room on the first floor was wired for entertaining and just rocking out the macaroons in the kitchen.

So we ran regular speaker wire (none of that fancy expensive stuff) from each Northeast and Southwest corner of each room all the way back to a single corner in the Dining room, where we plan to have the audio receiver setup.

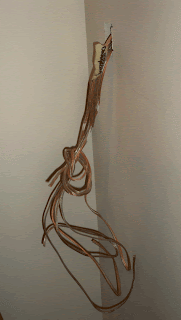
We made sure that when the drywall went up that the holes were punched out in the exact center of the joists so we could fit the speakers in. That dangly wire in the first image above has been there for months. It's time to go away... we just got the speakers we ordered from Ebay today.

Currently there are just a bunch of wires dangling from holes in the ceiling and a group of six sticking out of the wall in the dining room.

First thing's first.... cut a hole in the ceiling. We only got two of the speakers today, so we decided to do the kitchen set up first.

Since I really hate making a mess with drywall dust, I rigged up the hole saw with a paper plate to catch most of the dust. It's not perfect, but it helps.

We also checked before making the cuts that the studs where where they were supposed to be with a stud finder.


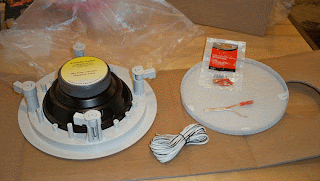
The speakers came with a circle template that, once we checked for studs (and used a metal clothes hanger wire bent at a 90 degree angle stuck up in the existing hole and rotated 360 degrees to make sure the clearance was there) we marked the circle with a pencil and went to town with the pull saw.


The first hole was a cinch.


We hooked up the speaker wire with some quick connections we picked up at RadioShack, slipped the whole shebang into the cut hole (tested it first for sound) and then screwed the speaker into place and tapped the perforated cover in place.

Easy Peazy.


Until we got to the second hole.

^&%$#@* &^$^#@*!

The damn plumbing pipe was 1/2 inch too low to fit the speaker in. We didn't discover this until too late. And of course, the wire hanger checked for joists, but not for plumbing.


If we moved the hole 3 inches over, the speaker would clear the pipe, and it wasn't like we had much of a choice.

So we moved the template over, and cut out the half moon piece out of the drywall.

We saved it for the patch on the other end, because, well, theoretically, the new part we cut out should exactly fit the hole we need to patch.

I screwed the half moon cutout to the 1"x3" with the board on the backside, so it would hang from the ceiling. I recessed the screws about 1/8" and made a small batch of Durabond 20 (the '20' means it sets up in 20 minutes) drywall compound to fill in the screw holes. Once this dried (and shrunk back) I filled the holes again.


The screws were too long, but wth, who's gonna see it?

I then applied some uber caulk-glue called Loc-tite Power Grab to the wood, on the underside, so it would adhere to the top of the drywall and I could avoid making new screw holes through the ceiling.


I then put the whole thing in the hole, adjusted the gap so there was an even 1/8" gap around the whole thing (I actually had to scrape away a bit to make sure the fit wasn't too tight) and let the glue set for 30 minutes.


And another batch of Durabond 20 drywall compound around the cut out, and a little sand block and a wet paper towel, I smoothed out the bumps and lines.

And my new best friend is a hair dryer.


Who knew a hairdryer would make it on to the construction tool list? But hey, it REALLY speeds up the curing time.... like from 60 minutes to ten.


Once dried, we checked to make sure the speaker fit, then added some ceiling paint.


You can't see the patch at all.


DH is rocking out downstairs with Luther Vandross and Blossom Dearie. It sounds great even from the second floor.

I've never had a system that sounds this good. The acoustics are absolutely wonderful.

I am so glad we planned for this.


Addendum by DH: We got the speakers from thedeepdiscount.com and I was very pleased with pricing and they had the speakers here by the end of the next day.

Friday, January 16, 2009

Timing is everything.

So I finish up the shower surround yesterday.

Today I open the Business section of the Cincinnati Enquirer, and there they are: Obama and Mark Schmidt.

Oh and btw: I messed up the link from the previous post. I had entered www.StudioVertu.com, but apparently the correct link is www.MarbleCoasters.com. I'll fix that in the previous post ASAP.


What do you think? Pop out a few of the plain old 4x4's and pop in a few Obamas?

Nah, I think I'td creep me out having someone staring back at me in the shower. Ew.

Thursday, January 15, 2009

The kitchen so far.

So we got the kitchen cabinet door fronts attached. It was so incredibly easy, I fell in love with Ikea all over again. So simple you can't mess it up. It took 2 minutes each.

We also got the soft close attachments-- they have little grey plungers that when you close the doors, you don;t get a thump, you get a swooooosh and a silent slow close. (*btw: big hint here for all you Ikea fans... although you are *supposed* to buy one closer for each hinge, you really only need one hinge per door at the bottom. Since they cost $2.50 each, it can really add up.


The stove vent is up, a pretty simple straightforward hanging process...that is, once you've gotten the hole through the exterior wall in the right place.

The pot rack was next.

The countertops were cut to size... had a snafu cutting one as I quickly realized I needed to cut them upside down for the best cut on the countertop. (whooops, I forgot.) Oh well, so I've got a small nick in the wood. I'll live.

The brushed nickle handles for the doors we also got at Ikea. We've seen them elsewhere since at over 5x the cost (at Home Depot). Dodged a bullet there. And please- if you're going to install your handles yourselves... BUY A TEMPLATE. There are these clever little plastic pieces with a bunch of evenly spaced holes all over it that you SHOULD use when determing where to drill your holes. It was a life saver.


Oh, and yeah, we replaced those gawdawful green seasick lights with some very nice speckled glass ones. On a dimmer.

Everything

is

on

a

dimmer.

Addendum by DH: Everything including the under-cabinet lighting. That was important and works very well. BTW, we were told that we couldn't dim them, but we went to a number of sites and they specifically say that xenon is dimmable. They are. They work well and they are efficient. Don't do halogen. I repeat, don't do halogen. It's hot and no matter what you do, it gets dangerous. I once burned myself on a spice tin that I had in a cabinet above the halogen light. That was THROUGH the bottom of the cabinet. Dangerous.

Bathroom sink & shower surround tile

Well the floor tile for the master bath is finished. The grout still needs to be sealed, but otherwise, it's done. Soon after we finished the floors, our plumbers were really pushing us to get the sinks in.

We'd been looking for a 5' double sink, but the costs for the countertop and base were ranging from $400-$900. A tad much for the budget at this point. We decided to settle for a single bowl sink and Stephanie at Ikea kitchens came up with the brilliant idea of using a kitchen cabinet for a bath cabinet. It's about half the cost, a bit wider (which I like more anyway - I always need more counter space, whether it's in the kitchen or in the bathroom) and worked out just fine. We got a 48" base cabinet in white, then topped it with a 50" laminated countertop. Since this sink was to be a drop-in, I had no problems whatsoever cutting the hole for this one. Viola, bathroom vanity sink. Insert plumber and the next day we had a working sink.

The next step was tiling the master bath shower. First thing's first: Beg wonderful and generous brother-in-law for excess 4"x4" tumbled marble from Italy. (He owns Studio Vertu in Cincinnati and uses these beautiful tiles to make the best marble coasters you've ever seen. btw: if you're looking for the perfect gift for the Democrat in your life, he's selling Obama commemorative coasters. They keep running out, so check out www.MarbleCoasters.com to order yours.)

Anyway, he buckled to the tune of 12 boxes of Botticelli marble, 50 tiles each. We Loooove Mark Schmidt.

We also love, but in a very platonic kinda way, OmniGrip. This stuff is the best. OK, well, I've never used anything BUT this stuff, but a tile contractor at Home Depot said they use it for putting marble tiles on the ceiling ... without supports. Um, ok!

I think I used waaaaay too much. Of course, I figured this out on the last day of needing to know. I used a 3/16 x5/32 V-notched trowel to spread the adhesive on the Hardibacker board, and in my own 'hey, let's do the overkill thing' kept it on a little thick. I liked being able to set the tile on the hardibacker and be able to squish it around and get the spacing just right. (I used spacers at first, but when I realized I didn't need to, gave up on them entirely. Again. )

OK, so how do I know I used too much? Well, somewhere along the way, the design got changed, and I needed to pull off some diagonally cut tiles off of the wall. Knowing I'd probably need them later, I scraped off the mastic from the backs, rinsed them in water, then soaked them in a bucket of water for 2 days. (Because I forgot about them. Ooops.) 2 days later I rinsed them off with fresh water, dried them off and stacked them on the sink, where they stayed for a week.

Today I needed those tiles, and six of them were stuck together so tightly I had to hammer a screwdriver in between them to get them apart.

Yeah, I used waaaaay to much mastic. Good stuff, though, really.

So back to the tiling.

I set my first tile up about 1/4" up from the tub surface (giving me room for caulking) and marked the top of that tile. Then I removed the tile and measured a grout line's distance just above that. (I'm using about 1/8" grout distance). That's where I screwed in a five foot long 1"x3" so that the top of the 1x3 was just at the line I'd marked.

This gave me support for the first row (support I ended up not needing, but if you can't find the mastic I used, I recommend going this way and using spacers to support each row.) and enough room for a row of tiles perfectly spaced underneath, once the 1x3 is removed.

In a previous post I made about the master bath floor tile I had to cut the tiles in front of the tub to adjust the spacing and I used tile trim to make this possible. At the time I said I'd then have to carry it into the bathtub surround in order to make it look like it was an intentional design instead of a screw-up fix-up. So about 8 rows up of tile, I arbitrarily decided that that's where the break between the horizontal tiles and the diagonal tiles would be, and inserted the familiar decorative strip. Above that, I used the 4' level to draw vertical lines to match up the diagonal peaks, and started placing in the tiles at a 45* angle.

Then I realized I'd have to make all the small cuts (with the tile wet saw) at the corners before I could set in the tiles for the left and right sides, and got started on those small cuts. I eventually pulled off the long 1x3 and put the bottom row of tiles in.

Once the small tile cuts were made on the left and right of the back of the shower (into the corners) I cut the 1x3 down to size and started over on the left side of the surround, same procedure all the way up, making sure that the cut tiles that terminated facing outward, were non-cut sides. Meaning: tumbled sides of the marble were on the outsides.

Actually, in order to reduce the number of funky small cuts on the outside of the surround, I started measuring from the outside into the corner. As this would actually be the second row, I lined up the left side of the first tile with the edge of the tub (personal preference) and measured inward to the corner. Then I set another row of tile on top, halfway between, just to see if it would look ok. I think nit turned out ok.


Oh, and there's the Ikea kitchen cabinet in the bathroom on the left of the picture, and you can see both tile trims (on the floor as well as in the shower) balancing off the tile.

It took me about 2 weeks to finish this, piece by piece. Frankly, it took a lot longer than I expected. I think I took 4 hours just on the first half of the back wall, but I did a lot of jiggling and squishing to make things line up. Once the mastic started to stiffen, good luck getting it to move. It would set up in 30 minutes, but not so much as you couldn't force it and re-set it.

The directions say wait 24 hours to grout... so that's next. Luckily, we have a whole bag left over from grouting the upstairs bathroom floor, and it should match perfectly.

We'll see......