Saturday, February 28, 2009

First Time Home Buyers Update


According to Paul Bogenschutz of the Home Builders Ass. of Northern Ky, the Kentucky Housing Corp plans to advance the federal first-time home buyer tax credit (up to $8,000) to be used as down payment money at closing.

Folks, here in the Covington Arts District, we've already got a $6,000 forgivable loan that can be used at closing for down payment. If you buy here in the district that's up to $14,000 in down payment help that doesn't have to be repaid if you buy your house this year and live in it for 5 years. 

Plus, if you do a full rehab (which it appears at this point is "building a home" for the purposes of the credit) you can also qualify for home energy tax credits if you replace windows, doors, furnaces, insulate, and possibly even if you put a metal roof on your home. This is a credit of up to $1500 at 30% of the cost of the applicable project(s).

Remember, the first-time home buyer tax credit is a REFUNDABLE credit. If you don't owe taxes, they cut you a check. There are income limits, but they're generous. The CARD loan/grant has no income guidlines.

Many of these funds can be used for new construction like the Pulse Lofts or for a rehab project like this one in our first post about the financing incentives.

Add these credits and grants to the extremely low rates that are available (5.1% right now for a 30 year), and, well, this is a heck of a time to buy a house, lemme tell you. These credits could be gone at the end of the year, however, so now is the time to get a move on.


Friday, February 27, 2009

Livingroom shelves, and a rant.

We just purchased a bunch of door jambs and it looks like this weekend is going to be spent finishing up some closet doors. We don't have any closet doors yet - we're working on that. We found some wood sliding doors from the Covington Reuse Center at a good price this week, asked to reserve them, then went home to measure to make sure they'd fit. When we realized I might have to take 1/2" off of the bottoms and that was ok, I called in to reserve the doors. I said we'd be in the next day with a credit card.

So we went to Home Depot to buy three sliding door closet tracks, then came by the CRC on the way home. Except that the manager then reneged on the price we were quoted the day before. She said we couldn't have them unless we paid 40% more than what we were offered because they were mispriced. Yeah, I was really ticked off. I walked out. Angry.

So key point here folks: All of you in Covington who go to the CRC, (or for that matter, any "Negotiated Price Warehouse")... if you like something, buy it THAT day. If you can't take it with you, put it on a credit card before you leave the store, because there if are no price tags on the DONATED items they sell you, they can and will change the price on you if you don't lock it in when you can. If you change your mind later and don't want them, just them them back. If there's a problem with the seller, you can back out the charge.

Addendum by DH: We did the math and determined that we still liked the doors enough even at the higher price so we went back for them. We ended up buying a bunch more stuff and the deal we got on the whole mess was enough to make up for the higher price on the doors. We left happy and we continue to recommend CRC. They really do want you to be happy and they have a TON of cool stuff.

ok, rant over, now on to the living room shelves: I'm stuck and could use some help.

I really don't like the way we've had to set up our living room. It just doesn't work right, and the flow is all wonky.

Right now the layout is like this: note that the sizes of the furniture pieces are not measured, they're just estimated. DH points out they are smaller than I've drawn them.


The entertainment center is in the the southeast corner, and all of the furniture is pushed along the East and North walls in order to make room to get to the stairs from the kitchen.

I was thinking more of this layout (below) with shelves along the stairway wall, and putting the TV (no, not a flat screen, not yet, anyway) on the shelf and put the DVDs and books on there as well.


The problem here is that I don't want to cover over our 'Harry Potter cubby' built under the stairs that I wanted for additional storage.

So I'm guessing it's gotta look a little bit like this, at least in concept, anyway. And I'm not too thrilled.

Does anyone have any other suggestions??

Plinth finished. I think.

Bottleneck at work:


Ah, it's just so hard to get your work done when the Out box is full.


Anyway, the plinth may be finished. It was actually quite easy.

The hardest part was getting the round leg clips lined up with the legs on the backsides of the plinth. If just one was off by 1/2", it would break off. Good thing they gave me waaaay too many in the base cabinet leg packages. Literally, they just snap into place... or 'off' as the case may be.

Odd how such a simple thing really makes a room look more finished.

Of course, now the cats are going to have to find a new place to hide their mousies.

The only question left is the issue of the plastic foot runners for the plinth. I like the way the plinth looks now, without the plastic runners, but I'm willing to see what it looks like with perhaps some brown spray paint on the plastic. I know they're designed to protect the plinth, but they just look wrong.

I think it's only the second time Ikea and I have disagreed on design.

Thursday, February 19, 2009

Master of Illusion


OK, I'm bored, so I thought I'd just toss in a fun illusion.

Which do you see, the squares or the circles in this image?

Hint: there are BOTH. Keep looking.....

Wednesday, February 18, 2009

The problems with plinth installation.


I'll just say that so far, all of the problems with the plinth are on the island. To be honest, that's probably because that's all I've finished so far.

The first problem is with the legs. Because I turned the sink cabinet end of the island 90*, the legs are not in line with the rest of the base cabinets legs. This means that when you try to line up the plinth with the legs you'll be attaching it to later, it just won't fit. I had to notch out a hole on both the west and east side of the island plinth to accommodate for the legs being rotated.

Here's what I mean.... this picture is taken from under the rotated base (sink cabinet) end. At the top of the picture, you can see the black plastic part of the leg that sticks out to the right. The other legs further on down are turned sideways and don't have that bump out.


On the other side, I had even more trouble... there were electrical wires coming up from the floor that we forgot to adjust for the plinth, so on this side I had to cut out for the sideways turned leg AND the metal wire casing. (Or I could have just re-wired the cabinet, cut new holes, and moved them... but I decided this was was easier... and again, no one would ever see it.


So I cut the plinth so it would fit.


Then it was just a matter of tapping in the wedges into the back of the plinth where the legs lined up, and sliding on the clips that attach to the legs. So far so good....


Ah, but wait... after I cut the west piece (above) to fit, I then measured and cut the south (short, non-sink) end.... and promptly cut it 1/8" too short.


Notice the awful gap. >;-(


The good news is that in the plinth package, Ikea supplies you with a lot of extra side trim pieces. They are actually wider than the plinth is thick, so you've got some leeway.


I cut a piece to the height of the board, set it into the gap right on top of the other edging, then trimmed off any extra on the left side with a straight edge razor.


Then I set a hot iron to it in several places to hold it so it would be flush against the floor and the abutting board, pulled it out from under the base cabinets and ironed it in place. When the adhesive is hot, it will slide around, so I had to try a couple of times to get it right before it cooled.

Viola, it's fixed.


OK, on to the plastic footer trim-like-stuff that comes in the box. It comes in the same lengths as the plinth, has a channel to snap the plinth into, and a little 'flange' on one side, I'm guessing to keep moisture away from the bottom edge of the plinth. Below, I'm actually holding it upside down.


As I mentioned before, I could still go either way, but I just think it looks... glossy, and a little goofy.


Maybe it's just the lighting in the kitchen, but I think it reflects light and draws attention to itself. Not what I'm looking for at all. I'm putting my vote in on the no-plastic trim side.


We'll see. We may end up spray painting it brown to match the wood grain (colour) and to get rid of the glossy finish of the plastic. We can always install it later.

Right now, I just need to sweep and mop the floor!

Tuesday, February 17, 2009

$14,000 in FREE MONEY

That's right. If you buy a house this year, you're eligible for up to $8000 in refundable tax credit from the Feds. That means that if you owe no additional taxes, they'll cut you a check for the lesser of 10% of your finished home value (presumably including rehab expenses) or $8,000.

Then, if you buy a property in the Covington Arts District, you'll be eligible for a $6000 forgivable loan (just stay here 5 years).

$14,000 isn't chump change. Then, there's $25,000 in potential low or no-interest loans available through the city, which they typically will subordinate to a bank loan, which lessens the amount of down payment you'll need to get a loan for a full renovation.

There's more and a picture of one of the available properties in our recent blog posting.

Installing Ikea plinth on the kitchen base cabinets

Yes, I know you've all been wondering when we'd get around to it. Apparently that time is now.

Actually, I'm just afraid of the dustbunnies that are growing under the counters. Sometimes I hear noises from under there, but I'm afraid to look. One of the cats is missing and I think she's under there.

So the plan is a scouring of the Shire, no wait.. wrong story. A scouring of the floor, yes, that sounds better. Then the installation of the plinth to prevent the return of the evil dustbunnies. (And it'll make the kitchen look a lot better, a lot cleaner looking.

The first problem, (and yes, there will be many) was to figure out what the deal was with the little plastic snap-on footer that came with the IKEA plinth. The instructions say to snap it on the bottom of the cut planks, I'm guessing to keep the water off of the cut ends of uber-absorbent particle board. Well, I gave it a shot, and you know, I'm just not smitten with the look. I'm still up in the air on this, but I decided to prepare to NOT use it.

So I decided to start with an experiment to see just HOW absorbent this particle board plinth is. I mean, lets say the dishwasher fails and floods the kitchen... how much damage can I expect, and can I prevent any?

I wanted to see if polyurethane could do the job of that little plastic "footer" that came in the box, so I poly'd one bottom edge of a scrap piece of the plinth, as well as the back bottom half.

In this first picture, the darker coloured bottom half of the plinth has been poly'd and is sitting on a plate with 1/4" of water in it. You can also note that the top right side is darker, too, but that's because I first tried to stand it on its side before I realized that wasn't a realistic test.


I let the poly side stand in water fo2 20 minutes, then flipped it over, dried it off, then sat the unpoly'd side in the water.

Serious capillary action, folks.

After five minutes, I snapped this next picture.


After 20, I took another.


The un-poly'd half was a sponge.

The *good* news is that after an hour of being out of the water, there was barely any noticable swelling, and it weathered the test rather surprisingly well.

I'd say if you have your kitchen in 1/4" of standing water for 20 minutes, you have more to worry about than your plinth.

In our case, I think any water that might come from the sinks or the dishwasher would trickle down into the basement before doing any real damage to the, oh 150 year old molten pine floors, or the plinth.

All in all, the poly'd side held up great, no visible water absorption at all. That's what I'm going for.


So I laid out the plinth on the boxes they came in and polyurethaned one the bottom edge as well as the backs, up about 1" from the bottom edge.

I did it twice just for the heck of it.

These suckers are waterproof.

Now when I make the cuts to fit the base cabinets, I'll just apply a little more to the cut edges before the final installation.

So far so good, but as I said previously, there are more problems ahead.

One has to deal with the Ikea feet on the island sink cabinet. Because we turned one 90* from the others, the feet are too far out for the plinth. Looks like we'll be doing some extra cuts in the plinth.

Garbage solutions

Many many moons ago, I thought I was going to cut a hole in the top of my butcher block island to make a slot for a garbage access. Well, it never quite worked out.

I think after the PITA of cutting the sinks out, I just withdrew the idea entirely. Not that I wouldn't love to just chop veggies on the butcher block then scrape the excess into a hole with a garbage can attached underneath.... in fact, I may still work on this idea down the road. It's just not a priority.

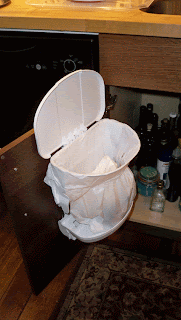
So in the meantime, for the island, we went to Ikea and bought a clever little plastic bag holder and attached it to the right side of the door under the sink cabinet. On the left side is a roll out garbage can. It's okay, but it's sometimes hard to reach down and pull it out. I just use my foot nowadays.


The other find was at The Container Store. It's a small plastic and wire contraption that holds plastic bags, holds them open, supports the contents, and comes with a lid. We put this right on the door of the main sink, and we're already using it more than the one on the island.

We love it.

I know, I know, "how sad that she gets excited over garbage containers" I can already hear it.

And of course, you'd be right.

Friday, February 13, 2009

Backtracking: Taking the fireplace down

I was just reminded of the story of the fireplace removal. We actually took the fireplace down back in March, 2008, but I never made a post about it.

I've been remiss long enough.

We decided pretty early on that we wanted to take down the back fireplace. This is the one that used to be an exterior fireplace before they built onto the home in (we're guessing here) about 1900. Since we knew we couldn't afford to have both of our fireplaces repaired for safe use, (the other one's in the Dining room to the front of the house, where it remains) we figured we could use the space.

Actually I was hoping to have the entire thing-- all of the bricks-- removed leaving just a big open space between the living room and the kitchen on the first floor, and between the office area and the hallway on the second, but that wasn't to be.

Here's where we started:

Up on the third floor, where the two rooflines

met, the gable roof and the shed roof, that's where the chimney poked through.

This is also where, over the years, the water was getting into the house. The water damage was incredible.

The plaster was popping off, and the bricks underneath, after 140 years of absorbing moisture, were flaking apart. If we didn;t take it down, it would have continued to crumble and eventually it would have taken itself down.

The roofers started the process by knocking down the exterior chimney to just under the roofline. Then they built the roof right over the hole. A complex procedure, if you ask me, getting all of those angles to meet up just right.

The we had to reinforce the roofline. (This is the same wall as the above picture after most of the plaster was removed. We left some because, as we were taking it off we realized just how soft the brick had become. In some cases, the plaster was holding the brick together.

The next part was to take down the remaining brick, so we brought in our go-to guy, Zach.

Zach was optimistic, but cautious. We weren't sure how structural the fireplace was to the wall between the original brick house and the add on fifty years later.

For a couple of hundred dollars he said he'd take down the brick for us, but before we did that, we decided to to a little 'spur of the moment' investigatory probing.

Starting in what is now our living room, (actually, to be more specific, this area is now our closet. See pic from at the end of the previous Doorbell post) Zach poked a small hole in the wall in the center of the fireplace. There was a hearth on both sides of this fireplace, btw.

It was a small hole. About the size of a silver dollar. Zach got a small flashlight and peered into the hole, squinting to see something past the brick opening.

Visualize now, Zach leaning in, peering into the abyss, one eye shut, one eye squinting hard... with both of us hovering in, leaning in behind him... as if by leaning in *hard*, we would suddenly trigger our x-men x-ray vision abilities, and be able to see *through* Zach and into the wall where even he couldn't.

Then it happened.

Zach snapped up his head in an instant just when a poof of greasy coal dust shot out of the hole right into his face like a sideways and filthy Old Faithful. Looking like perfect caricature of Al Jolsen, Zach wiped his face with his handkerchief... and kept digging.

For at least three to four weeks afterwards, this picture above of the hole in the fireplace wall was the cleanest this place ever was. After this picture, hell broke loose.

You see, Zach went all commando on the fireplace brick just after this picture was taken. This small investigatory hole at the *bottom* of a 140 year old fireplace was just the beginning. It wasn't that the hole got much bigger, it probably ended up being about a 8' x 12" hole by the time he called it quits. It was one hundred and forty one years of soot that really put the damper on the whole "what happened to my clean worksite?" thing.

I do not have a picture of what happened next. I think I was in shock. Slowly, the soot began to cloud out of the hole and Zach started scooping piles of soot out of the hole and onto the floor, where it poofed into much larger clouds. Soon, we weren't able to see five feet in front of us. Then three..

That's when I bailed and ran outside.

That's when 300 pounds of soot came down the chimney and out that little hole. It went black inside the house.

Into my house.

My previously clean house.

When the black greasy clouds started coming out the front door, that was enough. I went home.

I left the boys to clean up THEIR mess. They didn't say a word, I think they knew.

I'll tell you, it was EVERYWHERE. Months afterward we were still using 2x4's with sooty footprints on them. Luckily, the soot was heavy and didn't could up to the second floor of the house, but the first floor-- all rooms, all surfaces, all tools, all lumber, all walls, everything was covered with greasy soot.

This spontaneous peek into the fireplace innards precluded any preparation to cover anything anywhere else in the house.

After the boys shoveled all 300lbs. of soot into garbage bags and into the dumpster, (it took a full 2 days of work) then I returned to the house with a bottle of Dawn dish detergent, a bottle of ammonia, and a mop. I just hosed the d@mn floors down.

There was still soot on the floors on the first floor until we sanded it off.

In the meantime, the brick came down smoothly. Most of the brick was not salvageable, but a large portion was, and it was neatly stacked in the basement for future use on, oh, maybe bricking in a door to become a window. :-)


Once Zach got to the second floor, things were going fine. The bricks were coming down quick and without any problems.

Here's the second floor fireplace after the face of the bricks were removed. You can see the chimney pipe holes in two different locations (one for the fireplace facing forward, and one hearth facing backwards. All of the different chimney paths were bricked in, and it looked kinda cool. I'd ignorantly thought that chimneys were just big gaping holes that went straight up to the roof with a damper, but not so.

There were at least four different channels, one for each hearth, going up to the roof. The neat thing is that it made a great place to run wires and plumbing.

Just remember to plug the holes for firebreaks.

Then we moved on to the first floor - oh yeah, remember to work your way DOWN from the TOP. Zach told us a story about a house he had been working on where they started talking the chimney down from the bottom. The base of the chimney weakened, and when the three stories-worth of brick collapsed in on itself and landed in the basement, I don't think even the insurance covered the mess that was left.

On the first floor, we had planned on taking down a lot more brick, but Zach put the brakes on when he noticed a change in the brick layout. Opting for safety and structural soundness over space, we stopped the chimney demo.

The space we took back would be enough for a small closet once we patched up the hole in the floor, and we had to accept that this would have to be enough.

The inside of the closet remains a somewhat odd trapezoid, but heck, that's what closets are made for: hiding your mistakes.

In the last picture, below, you can see the place where we patched up the chimney hole in the basement, right where we plan on running the wire up into the closet for our doorbell ringer.


So, yes, we removed a large portion of our fireplace, but seeing as it was on a structural wall in the middle of the house, we couldn't remove the whole thing and leave a space. We had to maintain the integrity of what once was an exterior wall, and leave a large portion of the brick intact.

I think it worked out ok.

Except for the soot part.

That sucked.

If you came here via Hooked on Houses blog party, or if you want to see it, start here: http://hookedonhouses.net/

Thursday, February 12, 2009

Shout out to Shane and Casey !!

DH just admitted to me that he wasn't sure we'd ever get the old hardened mastic of off the tub floor after getting it ground in like it was after tiling.

I had already tried comet and a toothbrush to scrub it off to no avail.

I was secretly kinda worried myself, particularly because I used the uber-stickum mastic, too.

Shane and Casy (see blog link below) replied to a post we made (link to previous post) and recommended scrubbing bubbles.

And then we got the high *paw of approval* from our Himalayan, Lestat, and we went with it.

It basically dissolved the mastic. This is the best tip I've gotten so far on this, and I'm spreading the wealth. IT WORKS.

I sprayed it on the tub floor, left it for five minutes then used a hands held scrub brush.

It was gone in 2 minutes.

Thank you guys so much!!

Check out their BLOG!

While I'm at it, Julia over at Hooked on Houses is having another Blog Party. She's not a DIY site so much as more general home site with more of an eye toward style, but after we finish building, we gotta make it look good. Check her out too.

Wadsworth Circuit breakers for sale

Time to clean out the basement... okay, I really want to head to IKEA and buy some Billy shelving, but since the budget is tight, it's time for an S.O.S. (Sell Our Stuff!!)

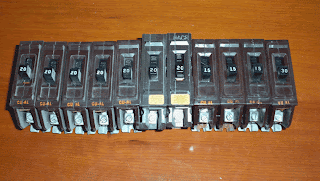
These old Wadsworth circuit breakers were in perfect working condition when we decided to replace and move the panel to the living room on the first floor from the basement.

We have:

seven Type A 120/240 volt, 20 amp, single pole circuit breakers
three Type A 120/240 volt, 15 amp, single pole circuit breakers and
one Type A 120/240 volt, 30 amp, single pole circuit breaker.


We also have one each of the following:

Type A 120/240 volt, 20 amp, two-pole circuit breaker
Type A 120/240 volt, 40 amp, two-pole circuit breaker
Type A 120/240 volt, 50 amp, two-pole circuit breaker
Type A 120/240 volt, 60 amp, two-pole circuit breaker


I'm probably going to put this on Craigslist, too. I've seen the price range from $20-$45 for the single poles, and double that for the double poles.

Momma needs a new set of white Ikea shelves. I could also work out a trade if you know anyone in the market.

Contact me if you're interested.


Funny thing is, I've seen these sold all over the country, but they were manufactured right here in Covington, KY. Neat, huh?

Wednesday, February 11, 2009

Speaking of old vs. new (stairs, HVAC)


Here's a transitional view from the original state of the house, just as you reached the top of the stairs at the second floor in 2006, then as of today.

Note the magical expanding staircase to the right and the disappearing wall to the left.

(The door down the hall was to the old bathroom. The window remains, but is now a hallway leading to the Master Bedroom.

:-)

BTW: If you want to freeze the animations, just click [Esc] button to stop, then refresh to restart/reload.


And, as long as we're showing old and new.... remember the HVAC problems from the kitchen and the laundry room? Link

Well, how's this for the laundry room:


And this for the kitchen-cubby:


Making your own 1/2" round door & window trim

I neglected to post what we did for the exterior windows a few months back. Since we're just about ready to apply this new trick to the exterior doors, I figured I'd back up a little bit and fill in the gaps.

Here's what the original (a.k.a. old and battered) trim looked like. A 1" 1/2 round to which the shutter pins were attached.

We noticed the trim missing from a couple of exterior windows; I guess they had rotted away when the shutters were removed long long ago. It wasn't a big deal, I mean we overlooked it for a year, so what the heck. The problem lied in what to replace it with.


And this one (the 'back window') is without the 1" 1/2 round trim.

I wanted trim.

So we looked for it.

And looked. Nothing at HD or Lowes, nor the local lumber yards.

We found that we could special order the 1" 1/2 round wood trim from a lumber yard about an hour away for about $10/foot.

Ouch. Not in the budget, particularly since this was NOT even discovered as a 'want' until later on. We'd be needing about 16' for each window at a cost of $160/window.

Time to improvise.


What we DID find at Home Depot was 1" 1/4 round plastic PVC trim. I figured, we'd lie them on a flat surface, glue them together with Loctite Power Grab, use zip ties to hold them together overnight and viola! 1/2 rounds that will NEVER rot.

So that's exactly what we did. And it cost about 50 cents per foot, well... $1/foot if you add both sides together.

The next day, after cutting the zip ties off of the lengths of plastic, they needed sanded where the glue squeezed out and I couldn't wipe off the excess under the ties. No problem.

Then we set off to cut them to 45 degree angles in the corners, cut all three pieces to make sure they fit together, then used industrial glue and nails to set the pieces in place.

Hint: When sawing the angles, do it outside. The plastic melting smell reeks.

Here's the first one with the trim installed on the right side of the window. This is the kitchen window.

Here's where it got tricky:

After all of the PVC 1/2 rounds were installed, it looked great, but there was still the 'channel' in the center of the two 1/4 round pieces where they were glued together. It wasn't going to look right if we just painted them over, we'd have to fill the gap, which was kinda the plan along the way... it just didn't work out the way we planned.

We decided to use caulk to fill the channel, smooth it out to a perfect invisible round, then paint it.

Caulk would just not work. No matter how hard I tried, no matter how many hours I put into the endeavor, I could not get the caulk to lie smoothly. I had DH try it himself when he was absolutely incredulous that I (me, the caulk queen of windows) couldn't make it work.

Much to his chagrin, he couldn't either. It was WEIRD.

So we gave up on caulk and decided to do a 180.

"Why make it perfect? If it looks perfect, it won't match the rest of the exterior. Let's make it look OLD instead. "

So what's going to look imperfect, but hold onto the PVC, and perhaps even be sandable so we can make it as smooth as we want? Wood epoxy. Specifically, Minwax® High Performance Wood Filler. It's a 2-part epoxy you mix together and apply quickly. It sets up very fast, so if you're using it for the first time, use small batches.


We mixed it and spread it on the channel, not too smoothly, but enough to cover the channel and make the PVC look like older wood. I made a small inverse-spatula to spread on the wood filler (see drawing.) by tracing the outline of the PVC 1/2 round onto a piece of plastic (I think from the lid of a cat litter container) then cut out the curve smoothly. I used this to smooth out the filler onto the installed PVC right over top of the round.

After 30 minutes, we sanded it, then it was ready to caulk the sides and prime for paint.


Here's the final outcome: (back window)


Both of these two windows were done (below), the one on the left was the door we bricked in and made into a window, the one on the right is the one I call the 'back window' above).

We have plans to trim out our exterior doors the same way.