Friday, May 27, 2011

Not Chamomile? Nope.


When Beth came over last week to take pictures of our home, she pointed at a bunch of flowers, growing in a 2' bush like clump, and asked, "what are those?"

I matter of factly regurgitated what I had been told that they were.

"Chamomile."

She looked at me quizzically and asked, "Are you sure?"

To which I promptly responded something in the overly confident affirmative.


Which of course, got me wondering.
And researching.


This (above) is Chamomile. This is not what we have.

And now, you know what? I have NO IDEA what our plants are.

So, if you've come to my garden in the past years, and you've been happily handed a clump of potted flowers with the assumption that you've gotten this lovely smelling chamomile.... please don't make any tea out of it until we figure out exactly what this sucker is.

Composite flower head, multiple (layered) bracts, alternate lobed leaf arrangement on stem. Plant height approximately 2 feet tall. Bushy in nature. When crushed, stems, leaves and heads smells faintly of menthol. Pleasant smelling.


I'm starting with the Aster Family.
Only some 5000 more plant identifications to look at.
http://www.wildflowers-and-weeds.com/Plant_Families/Asteraceae.htm

UPDATE: I think I found it. Could this be Feverfew (Chrysanthemum parthenium)?? If so, don't make tea out of it if you are pregnant -- but it's ok for a headache. --Whew!


Thursday, May 26, 2011

$37,500 FINE PER DAY!

(uncredited photo from Fine Homebuilding)

As some may remember, I'm the certified lead-safe work practitioner here. I've made other posts on the matter and my position is that you don't need to freak out, but you have to use some common sense and a modicum of care.Link
Obviously, I'm not going to get hysterical when others don't do it perfectly, and I generally just warn folks who aren't doing it right to clean up before hugging kids and to keep their kids out of their dirty truck, don't dry sand, and the like. Adults are harder to hurt with lead. Kids are all too easy. So, besides worrying about the kids, I'm pretty mellow with regard to contractors not under my watch, but it really rankles to see folks pretending to be qualified to deal with lead paint while subjecting everyone including neighbors to unacceptable amounts of lead dust.

It looks like the hammer is coming down, finally. I have mixed feelings about level of the fines, but it is very much time to stop giving these guys a free pass.

EPA Nabs First Lead Contractor

I guess what I'd really like to see is for the EPA to have more realistic and meaningful standards and then do more enforcement on egregious malfeasance like this (using electric sanders on the outside of the building without any containment).

The downside of draconian EPA enforcement measures (as you may see in the comments on that blog posting) is that no contractors will work on older homes, or when they do, they either charge an arm and a leg, or they simply remove lead painted trim (or have it removed in the dead of night) rather than strip it--killing the historic charm of yet more buildings and perhaps creating more, worse health problems.

So, Good on the EPA for hammering a dangerous violator but now it's time to loosen lead clearance standards, firstly--they're meaningless now-- and then encourage compliance with best practices without using fear and intimidation for minor infractions.

Tuesday, May 24, 2011

The award.

I want to thank whomever nominated us for the Covington Preservation Society Award thing we went to tonight. I'm sure someone meant well, and we both thank you for your intent... but please, next time-- please don't.

We did not build this home from the inside out for anyone but ourselves. We designed it from scratch, built it with our own four hands, and we had hopes that others would follow in our footsteps. That's the reason we created this blog- to inspire, to help, to advise, and above all-- learn from our mistakes.

We did not rehab our home in order to meet any requirements other than our own use and enjoyment, so an award is not necessary, but more importantly, an award wherein the sole intent seems to be to showcase the Historical Society's disappointment at our inability to 'restore' our home to some historical standard, (when we bought our home it was, as you can see from this blog, a total mess with NOTHING to preserve) and therefore to present us as a sub-standard disappointment was humiliating.

To explain - the other 'Historical Renovation Award' recipients were photographed beautifully, special care taken to show the careful paint choices, the woodwork, and of course, the decor. Ours? We got a great photo on the front of our award highlighting the chain link fence we have yet to replace with the wrought iron one in the back yard. Any pictures of the corbels we spent days researching and painting? The hand made sills, the stone work?

Oh, and the picture of the spray foam installation. Yeah, THAT was a keen choice to present to the Historical Preservation Society. Ugh. I was so embarrassed. It only served to remind me of just how much more we have to do, and that this is an ongoing process.

That's ok, I guess- I knew that going in.

We have only tried to improve this community- and dammit, we have done more for our community than most. We INVESTED in it. We LIVE here.

She may be rough on the edges, she may have a lot of work to do, but we built this house from the inside out, and I, for one, am proud of what we have accomplished so far.

I hope we get a few more folks like us in the neighborhood. Galt knows we could use someone new to borrow tools from!

Deep breath.
All is well.
Deep breath.
Back to work.

Monday, May 23, 2011

Stair Trim-- partial finale.

Well, it's been a while and I have been quite remiss on updating the blog. Lots has happened.
For one, we are still undecided as to whether our next endeavor should be an arc or not. There's two of us, the two cats, and then there's the 40 days and nights of rain we've been getting in the region.

Needless to say, it hasn't been much of a Spring, and any moment the sun pokes its head out, I try to get something planted in the garden before I sink into the mud.

The weeds are absolutely thriving. We're nearing an all out man v. weed war here.

The good news is that when it's not raining, I can yank out the 16' trim boards out of the house and into the yard so I can work on the trim for our lovely 1st floor stair trim.

I started planning this last year, but never got up the courage to tackle it. See previous head scratcher here.

I originally thought I would have to use some sort of a large compass to draw the uneven stair treads onto the 16' trim board, then cut it out. I even built a compass out of dowel rods and wing nut screws. Turns out that was an exercise in futility.

Who says I don't get any exercise any more, eh?


Nah, I started out the old fashioned way.

I put it off for a year.


I started taking measurements.. enough to realize that this wasn't going to work for me. None of the steps were even enough to even think of a template. Non starter.

So I decided just to make ONE step, then see how OFF it was from step to step. AT least that would give me a general idea of how much I needed to tweak the layout.


After cutting out a general template that 'mostly' fit all of the steps, I nailed a16 footer to the wall to make sure it wouldn't move, then used the template, a straight edge and a level to mark the horizontal tread level and the nose of the step. Once I had these marks, I could adjust the template to get a pretty good generalization.


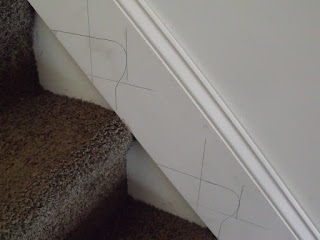
We decided to have a 2" relief of the trim (measuring 2 inches in from the top edge at a 45* angle). This determined where the nose edge and tread marks were made.

Then the cutting.


I cut out the steps rather gingerly. I'd rather cut away too little and have to pare the cuts down than to remove too much. (BTW, on one step I did cut away too much, but I've got a nifty trick to fix it.)


So after the cuts were made - yes, I cut these in the dining room. Did I mention about the whole rain/arc thing?--


There was one step that was just... well, WRONG. No matter of pushing, nudging or persuasion was going to work.

So, yay for Bondo!!! I measured the gap, mixed the Bondo, pressed it up against the form with a straight edge, and taped it in place while it cured. Once it was cured, I glued it in place, sanded it down and painted it.

You'd never know it if I didn't point it out.


, so now everything's in place, but because we wanted that 2" relief on the top edge, we now have these triangular nooks/holes at the base of each stair. (you can sort of see this on the bottom step of the following picture.)


Easy fix. Bought a sheet of 1/4" thick MDF, cut it into 4" strips, then routered slight bullnose edge onto each side of the 4" strips, then painted them white. Two coats, minimum.

When they dried, I made diagonal cuts back and forth so each triangle I cut was usable in the corners of the stair, with a long bullnosed hypotenuse.

N.B.: not all of the triangles were right angles. I started cutting them all the same and then realized how foolish that was. I used one right angled piece as a template, setting it in each step to check the fit, then cur a whole bunch of 92-96* angled triangles for the uneven steps.


Then when it was time to nail everything in place, I cut a small square of MDF out of the trim board scraps, and placed the 1" cut square in the hole, then nailed the covers in place. Viola.

But, before that final step, there was the issue of how to cut the angles at the top of the stairs and the bottom.

I did a lot of research and never got a really good answer, so I made one up myself.

First of all, I had left a little room at the top of the 16' trim board to play with. I used a straight edge to extend a line from the top edge out past the end of the board. Then I pulled it out of the way and placed a trim board along the floor in the hallway where it would necessarily intersect with the stair trim.

I drew a line out from the top of that board until it intersected with the line from the trim. I then marked it with blue tape. I then drew a line with a straight edge from the TOP edge of the blue tape intersection top the bottom edge of the blue tape, and then extended the line down to the floor. That was my bisect line.


Then I eyeballed what looked to be a good wedge size for a transition piece, and measured out equally from the bisect line, then drew a line from each measurement down to the center bisect line at the floor. I traced this on to a piece of paper, then transferred it to a piece of floor trim, cut it out and used THAT piece to draw my cuts on the floor trim board as well as the stair trim board.


Then nail into place, caulk and paint.

Oh yeah, remove tape. Heh heh.


At the bottom of the stairs, I took a slightly different approach, but used the same blue tape. Once the base of the stair trim was cut so that the long 16' board could fit into place, all I needed to do was figure out where the horizontal board would intersect, then cut both boards at the intersection. This time, no filler piece is needed.


This one was a lot easier than the top. But now it's done!!


Oh cr@p--- now it's on to the second floor stair trim going up to the third floor.

It never ends, does it?