It's been a while so I'll refresh this subject. We've been keeping track of the birds (and other wildlife) that we see in or directly over our tiny urban back yard. It has really been amazing how much we see back there.
The next addition to our list is the Eastern Towhee.
More here at Cornell's All About Birds
I encourage any of our readers to take this up. It's a lot of fun and rather amazing to realize how many species come into your yard.
Here's my list so far:
Canadian Geese
Mallard Ducks
Turkey Vultures
Red Tailed Hawk
Red Shouldered Hawk
Chickadees
Mourning Dove
Rock Dove
Downy Woodpecker
Robins
Juncos
Grackles
European Starlings (invasive)
English Sparrows (invasive)
Chimney Swifts
Blue Jay
CrowsCarolina Wren
Cardinals
Brown Thrasher
American Kestrel
Rose-Breasted Grosbeak
Mocking Bird
Tree Swallow
House Finch
Goldfinch
Great Blue Heron
Northern Flicker
Ruby-throated Humming Bird
Sharp-shinned Hawk
Cooper's Hawk
Red-headed Woodpecker
White Crowned Sparrow
Song Sparrow
Baltimore Oriole
Tufted Titmouse
White Breasted Nuthatch
Eastern Towhee
Wednesday, February 22, 2017
Thursday, September 22, 2016
Amy
He walked up to me, whistling a tune.
With a quizzical, yet
friendly face, he stops to remark to himself, “Now where did that tune come
from?” He steps further into the kitchen
looking for a second cup of coffee when his eureka moment kicks in. “Oh my God,
our milkman used to whistle that when he delivered milk to our house. We HAD a
milkman. Lyle the Milkman.”
Much to my chagrin, he is abjectly amused at his recollection.
“He used to whistle a tune to let us know he was coming into
the house. He used to just set the milk on the back porch, but eventually, he’d
just come in the kitchen and leave it in our fridge.”
A moment of silence. The understanding of how times have
changed creeps in on our morning. We used to allow service personnel into our
homes. Every day. No locks, no digital cameras letting us know who was on the porch
via your phone, or intercom system. “Just leave the package on the porch” we
can tell the UPS delivery person. From Guadalajara.
“The milkman used to give kids rides. He had a big delivery
truck. Did it all the time.” Making imaginary routes in the air, on an
invisible map only in his mind, he starts tracing the route around his
childhood neighborhood. “I guess he just went around and around. It was pretty
normal.”
Giving little ten-year-old kids a ride on a truck. Picking
them up in your neighborhood, and just ‘driving them around in your delivery
truck’. Normal. Nowadays, there would be an Amber Alert, a call to arms, a
dragnet and blockade in that neighborhood. There would be kidnapping charges,
and probably child molestation implications that would ruin lives. Hell, the parents
might have their kids taken away by Child Protective Services. Or jail time.
Parent Neglect. Abuse. How dare you allow your children to trust people. Shame
on you.
Now, he is in full memory mode. “You remember the girl I
grew up with? You met her a few years ago. Amy. Amy Something.”
“Blonde?”
“No, Brunette.”
“I don’t know her.”
“You met her.”
“Doesn’t mean I remember her.” I respond.
“She used to live near me. On that street near the other
street.”
At this point, I’m just trying to maneuver my way around
him. If I didn’t need that second cup of coffee before, now I do. “Which
street?”
He shrugs. No doubt he’s still reliving the last time he
rode around in a white milk delivery truck with the doors wide open and not a
seatbelt in sight, wind in his hair, head stuck out like a happy Golden Retriever.
He continues, “Amy. She reminded me of the milkman rides the last time we
talked.”
This was what, three years ago? How am I supposed to
remember her name when he can’t? I’m about to start blocking this conversation
out of my head. I know where this is going.
“Amy. Amy…. Hayden? She lived near where Kelly rides
horses, which is owned by..” He chuckles to himself. “A different Amy.”
Here we go.
“Yeah, another Amy.”
“She lives on the street?” I offer. Damnit, you just walked
into this one, I think to myself. I have to remember to just STFU. Keep your
head down, let it pass, but noooooo. Walked right in to it. Again. This one’s
gonna hurt.
“Not on the same street, the one near the other street.” He sighs, like it was sooooo apparent. Duh.
“Uh, where does Kelly ride horses?” Thinking that was
somehow important to his story.
“It doesn’t matter, it’s just owned by Amy.”
“Which Amy?” sneaks out of my mouth before I can cut it off
and strangle it with my own two hands, and beat it with a hammer until it
whimpers an apology and dies.
This continues for a few more minutes. Which Amy? Which
street? Which kid on the truck? I have no idea what he’s talking about, and for
the love of kittens, I hope he doesn’t either. He’s lost in a childhood memory,
sprinkled with reminders of kids on his block who don’t live there anymore, but
if there’s one thing I do know it’s that my husband knows too many Amys. There
is a goddamed plethora of Amys in his past. And it is apparent to me clearly
now that they are all in this story. I remind myself not to get involved in the
conversation, but of course it’s too late for that.
He’s still going on about these Amys and I’m off thinking
about how many lives would be ruined if a man delivering, well, anything… let a
kid on his truck to ‘go for a ride’. Lawsuits would be born on that day. Ugly,
mean lawsuits. Child therapy would be needed to get over the trauma. God forbid
if there as candy involved. This is why I don’t have children. I don’t think I
could handle delicate little damaged humans. I’d be chucking them out in the
dirt. Making them eat dandelions and worms just to try new things. I would be
labelled a bad mother.
I’d be a great mom. But one thing I could never do, not
after today, not after this rambling conversation. Ever in a million years
would I ever name my daughter, “Amy.” I hate Amy, all of them. Even though I
have no idea who she is, what street they all lived on or what horse ranch ‘All
Amy’ owns.
At this point, I’m out of the kitchen, walking away with my
cup of boiling hot coffee. I’m walking away from the conversation… see?
Walking. Away.
He’s not getting the point. He’s just found some new way of
associating the first Amy with the third, or the second. I just don’t care
anymore. I’m done. I’m out. Tap. See me tapping out? Done.
I sit down, and turn the TV on. I increase the volume.
He doesn’t notice, but he is moving on… up the stairs to his
lair.
And I step in it again. Can’t let it go. “You know, I have
no idea what you have been talking about. Who you are talking about, where they
live. I know more about you than I do any of the people you have been talking
about for the past fifteen minutes.” Not done, yet. Breathe. “You do this to me
all the time. It drives me crazy. You need to stop this.”
He takes a few more steps up the stairs and chuckles. Sips
his coffee. He wins again.
And now I want to take him for a ride in a truck.

Wednesday, May 14, 2014
Mark's Trout in Sage Browned Butter with Baby Artichokes
Mark's Trout in Sage Browned Butter with Baby Artichokes
This dish is all about bringing out the rustic goodness of the ingredients. It seems simple, but pay attention and you'll be surprised by the depth of flavor. This recipe is "Paleo-Friendly".
Figure on one 10"-14" trout and 3 baby artichokes per person.
For two Trout:
4 sage leaves per trout
2 Tbs butter
salt and pepper
1 small shallot
For the Artichokes
3 Baby Artichokes (p.p.)
1 T salted capers, rinsed and drained (you can substitute brined capers, but be sure to rinse them)
1 clove garlic, chopped
2 tsp olive oil
a squeeze of lemon
salt and pepper to taste.
Start your fire, and when the coals are hot, arrange them on one side of the grill. While the fire is getting ready, blanch the potatoes for 4 minutes, then drain, and add oil and salt and pepper. Toss to coat. When the grate is hot, add the potatoes, flat side down, directly over the coals (if the fire isn't too hot for you). When they start to brown, turn and move them off the main fire, and cover (vents open). Cook for 10 minutes while you prep the trout and artichokes.
Pluck off the outer petals until you get to very pale leaves. You want them to be quite tender as you eat the entire thing. As I get well into pulling the leaves off, I'll bite into a leaf every so often (they are edible raw). If it is tender at lest half way up the leaf, then I've gone far enough. Cut the tops off the baby artichokes and any brown part of the stem. Keep them in acidulated water to keep them from turning brown until you're ready to cook, then dry them briefly, and halve.
Rinse and dry the trout. Salt and pepper inside and out. Stuff a sage leaf or two, as well as a couple slices of shallot inside each trout. Melt butter in a large non-stick pan with one or two sage leaves over medium-medium-high heat. When the butter is melted, add the trout to the pan.
While the trout are cooking, heat olive oil in a pan with a lid. Saute' garlic for a moment, then add capers and saute' until the garlic is just beginning to brown. Add the artichokes, toss, add salt and pepper to taste, and cook for another minute, then toss again. Repeat for a couple more minutes, then cover, and lower heat to medium low.
When the trout are browned and the skin is crispy, turn and add the shallot and remaining sage. You may want to chop the sage in order to get it in contact with the butter more easily. The idea is to lightly brown the shallot and crisp the sage while the trout finishes cooking (perhaps another 5 minutes.
Right before the trout are done, take the lid off the artichokes, raise the heat, and arrange them so they are evenly browning, and cook off any excess liquid. Add a squeeze of lemon and plate with the trout.
Serve with a dry pinot grigio or perhaps a sauvignon blanc. You can (and we did) serve with a light red and the fish is more than a match.
Wednesday, May 22, 2013
Good bugs, Bad bugs
A quick walk in to the garden and there was a swarm of these ugly black and red bugs all over the greenhouse, the raised beds, in the lettuce bed -- just everywhere. I'm talking hundreds upon hundreds of these little suckers:

Creepy little monsters, aren't they?
Ok, so they're not so big -- and not so bad, either. In fact.... I was ecstatic to find them. They are lady bug larvae and they can be some of the most voracious eaters of aphids around. If you see them in your yard - CELEBRATE.

On the other hand, if you see these little bastages (below) prepare to kill.

I used to be squeamish about killing bugs with my bare hands.
I no longer have that problem; I squish these evil cucumber/melon killers with my bare fingers.... they are pure evil incarnate -- they carry bacteria that kills/wilts your melons, cucumbers, zucchini, squash, etc. so when they bite into the vines, the bacteria spreads the wilt in both directions, out to the fruit and back to the root.
What ever was growing.... will die.

DH and I killed about 30 just yesterday on my campanula. They are apparently mating.
What a way to go....
Tuesday, May 14, 2013
Making feta cheese
Ok, well I didn't think to capture the first part of the recipe visually, I suppose, because it's BORING.
But here it goes anyway:
1. find fresh goatmilk.
2. avoid the Fed dairy-nazis
3. sterilize a metal pot (with lid) by steaming a few tablespoons of water in an empty pot for a few minutes.
4. dump the hot water down the sink
5. dump in 1 gallon of goat milk, stir in 3T bacterially infested yogurt (or buttermilk) bacterial cultures must be alive
6. dissolve 1/4-1/2 tablet of Rennet (found in the ice cream section of your grocery store) in a few tablespoons of water and add it in as well.
7. Stir.
8. Wait 8+ hours.
You will be looking for something called a 'clean break'. This is when you poke your finger through the surface of the congealed milk and the surface 'separates' around your finger instead of leaving a film on it. You're looking for solidification. If you don't have it.... wait. If after 20 hours... something went wrong.
What I like to do is cut the curds into blocks. It makes them easier to handle.

One they're cut up, I have a large bowl with a colander sitting in it, draped over with cheesecloth. I pick up the cheese blocks and set them in the colander. SAVE THE WHEY. (This is the milky solution that is left once you remove the curds.)


Once all the cheese blocks are sitting in the colander on the cheesecloth, you'll want to grab the corners of the cheesecloth and pull them upwards to make a sling. Then I like to use either a rubber band or an Ikea bag chip clip to collect the cloth at the top of the cheese ball.


Then I use either another rubber band or a string to hang it from my upper kitchen cabinet handles for about 3-5 hours, sometimes checking the cheese inside and tightening the clip down to make sure the ball is being 'squeezed'.

While you wait.... you'll need 2 empty tin cans. A larger can (V8 can for me) and a smaller can (big can of tomatoes) to fit inside the larger one. Poke holes in the larger one along the bottom.

Then once the cheese is pretty much as stiff and dry as you can get it, shove the cheeseball into the bottom of the larger can. Then squeeze the smaller can in on top of it, wrap it with rubber bands lengthwise (top to bottom across the outside of both cans) so that the pressure is maintained on the cheese smushed between them, then set it in a bowl so that there is room for more whey to get squeezed out from the bottom, but not have the cheese sitting in the whey.

After a few days in the fridge in the apparatus, you can pull out the squooshed cheese ball from between the cans, cut it in to little feta slabs, and store it in.... the whey you saved from before!!
You will want to add salt so that you have a 10-12% brine solution, about 20 oz of whey per 4-5T of salt. Then let it brine. The longer you let it brine in the refrigerator, the drier and crumblier it will become.
Enjoy!
You will want to add salt so that you have a 10-12% brine solution, about 20 oz of whey per 4-5T of salt. Then let it brine. The longer you let it brine in the refrigerator, the drier and crumblier it will become.
Enjoy!
Tuesday, May 7, 2013
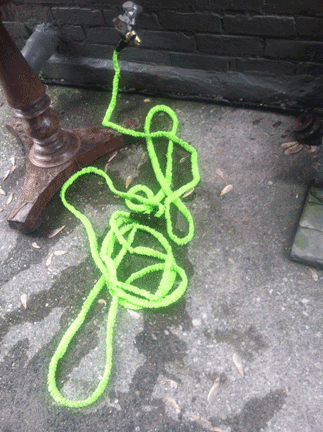
'Pocket Hose'? Euphemism or 'As Seen on TV' ad...
Actually it's both.

The concept is simple enough -- and yes, I did see it on TV. It's a hose that shrinks down when empty, saving space, and when it's full of water, it expands to a 50 foot hose. Viola.
I bought this 'pocket hose' for $20 at Bed Bath and Beyond yesterday because our old hose spontaneously decided to burst open and water the garden all on its own. I figured what the hell, it was $20 and if it was as good as it appeared it might be, it was a deal. It weighs less than a pound and is very easy to move when empty. Also, when it drains, you can hide it in a small flower pot. Very nifty indeed.

So I plugged it in to the spigot, unraveled it a bit to get it started, and turned on the water. It immediately expanded and all the wrinkles dissappeared, leaving me with what appeared to be about a 3/4" taut hose. It worked!
The business end of the hose was closed off with a small toggle valve, and in order to get the water out of the end of the business end, you had to twist the knob.
Which promptly snapped off in my hand, spewing me from head to toe with several gallons of water.

So long story short, the hose filled up with water, then lasted approximately 5 seconds before breaking.

I love the concept. I love the water pressure.
I hate the poor fittings and the impromptu shower.
If they makers ever get the crappy plastic fittings shored up, I'll think about buying another one, but this one is going back to the store tomorrow for a refund.
Also, why neon green?? Come on people, it's going top get dragged through the mud, how about making one MUD COLOURED?

The concept is simple enough -- and yes, I did see it on TV. It's a hose that shrinks down when empty, saving space, and when it's full of water, it expands to a 50 foot hose. Viola.
I bought this 'pocket hose' for $20 at Bed Bath and Beyond yesterday because our old hose spontaneously decided to burst open and water the garden all on its own. I figured what the hell, it was $20 and if it was as good as it appeared it might be, it was a deal. It weighs less than a pound and is very easy to move when empty. Also, when it drains, you can hide it in a small flower pot. Very nifty indeed.
So I plugged it in to the spigot, unraveled it a bit to get it started, and turned on the water. It immediately expanded and all the wrinkles dissappeared, leaving me with what appeared to be about a 3/4" taut hose. It worked!
The business end of the hose was closed off with a small toggle valve, and in order to get the water out of the end of the business end, you had to twist the knob.
Which promptly snapped off in my hand, spewing me from head to toe with several gallons of water.

So long story short, the hose filled up with water, then lasted approximately 5 seconds before breaking.

I love the concept. I love the water pressure.
I hate the poor fittings and the impromptu shower.
If they makers ever get the crappy plastic fittings shored up, I'll think about buying another one, but this one is going back to the store tomorrow for a refund.
Also, why neon green?? Come on people, it's going top get dragged through the mud, how about making one MUD COLOURED?
Wednesday, April 24, 2013
Hoop houses made easy
It was brought to my attention that someone couldn't find a post on our hoop houses... and neither could I. Could it be that I never posted pictures? Yeah, it's possible.

Two years ago, DH built a lettuce box (post here) and did a darn good job of it too. It's doing incredibly well.... but I made a few minor adjustments and added some increased functionality, like having the seedlings survive an early frost.
First of all, like any good project, it's a reason to go to Home Depot.
What I added to the lettuce box was pex... sharkbite flexible plumbing tubing. The tubes are 1/2" pex (about $3/10' length) I cut them down to 5' lengths for the lettuce box and attached them using 1/2" plumbing clamps.
Then I bought a 3/4" length of pex to cut in to smaller pieces for the clamps. I checked at the store to make sure that the smaller pipe would fit inside the larger pipe... I recommend doing this if you decide to use different sizes.
For the 3/4" pipe, I tried several different sizes and lengths, and depending on whether you want your clamps to be hard or easy to remove, you'll want to have enough tubing to experiment. I've found that what works best for me is lengths cut on the circular saw in about 2" lengths, then use a box cutter blade to cut a straight slit down the side, and then a second about 1/4" away .. .. and it's not as easy as it sounds. Once the first cut is made, then you make the second cut.. to end up with a 'C' shaped 2" bit of tube.

Then the plastic: we had some leftover 6 mil plastic from either the water feature episode of the rehab or from various paint jobs around the house, and I started with that.
I wrapped one long sheet over the top of the hoops and used the clamps to hold the plastic in place. Works like a charm.

In fact, it worked out so well that I went full scale on the raised beds as well, but instead of using 5 foot lengths, I used the full 10 foot length for the maximum height.


Another difference is that I decided to use clips that were harder to pop off (at first, when we got a strong storm, the smaller clips could get popped off from the plastic. I got tired of that, so I used longer pieces and smaller channel cuts that held better.
Because the clips held better, it was easier just to install a zipper, the kind used for drywall containment areas. (Find them next to the 6 mil plastic at the store.) MUCH easier than popping off the clamps and then reinstalling them afterward.
I also used three separate pieces of plastic instead of just one, as for the smaller lettuce box. One large sheet across the top and two smaller squares for the rounded ends. I just clamp them all together as shown in the image above.


It took me hours to hand sew in place, but I guess it was worth it considering the results.
Friday, April 19, 2013
Front garden pics... and a foundation leak?
Tulip bulbs are in and almost blooming, and we've got Dusty MIller, a yellow poppy, lithodora (tiny blue flowers), a purple Columbine, a few seedums, and a ton of purple Irises.

The Irises will probably take longer than normal to bloom, seeing as how they've just been transplanted. I was a little rough splitting them apart. They were VERY compacted and in a bad way.
The Irises will probably take longer than normal to bloom, seeing as how they've just been transplanted. I was a little rough splitting them apart. They were VERY compacted and in a bad way.
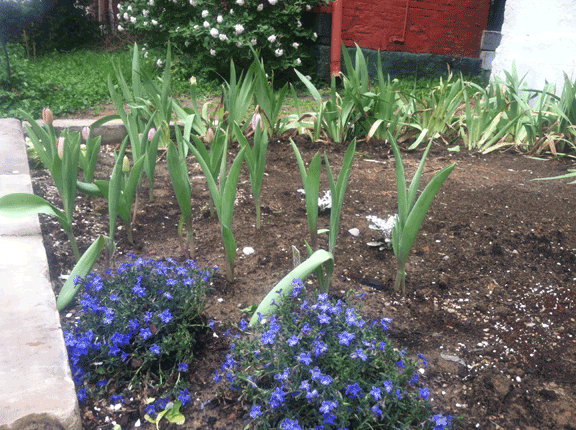
Tulips and seedums ... oh and bugger me Elmo if the picture on the flat of tulips didn't say "RED TULIPS". These look decidedly pink.
I am not a 'pink' kind of person.

I have wanted this for so long. Yay, me.

More to come....
Oh, and btw, we had our first big rain (read: I watered the #@&^ out of the garden after I installed the dirt, but before I planted the flowers) and it leaked water from the outside of the house into the basement where the old coal chute used to be but was 'sealed over' long long ago in a galaxy far far away.
Not a puddle, but moisture. Enough to be a concern.
So before I put the flowers in, we dug up the dirt right next to the house, and out about 3', in a slope away from the house. We tacked in some 6 mil plastic sheeting, and laid it on the slope as to divert water away from the foundation of the house. Then we used concrete adhesive and glued it to the house, cutting it off a few inches above ground level so you can't really see it at all.
I'll let you know how it goes.
A funny thing happened on the way to the garden
last year I bought a lion statue for the garden.
What I wanted was this gorgeous beast, weighing about 2000 lbs. and so far out of budget I couldn't even pretend to wave a credit card at the website with a straight face. Not gonna happen.

So what I ended up buying was this guy (below), about 3' tall for $40, made of plaster. Designed for outdoor use.
Off to the garden you go. Shoo.
Then winter came, and amazingly, our lion statue held up rather well... until Spring, and the sun shifted in the sky.
You see, it all started with these crappy old windows we had stored in our basement. We kept the ones that had the glass intact, I'm really not sure why. I guess we had fantasies about fixing them up. But you know me, I can't let anything go to waste. I'll eventually make something out of it.
And so I did.

So what I ended up doing was taking the glass out of the windows and painting the sashes white, then I ordered a couple of sheets of mirrored plexiglass to replace the glass with.
I used a box cutter to cut the plastic sheets to fit in between the muntons (divided light wood pieces) until someone told me I could use a reciprocating saw. Then I went straight for the circular saw and made my life a lot easier.
I bought the sheets here, btw:
http://www.estreetplastics.com/Plexiglass_Acrylic_Mirror_Sheets_1_8_thick_s/38.htm
Once I had the plexi pieces cut, I caulked them into place and used small tacks to keep them in on the backside of the sash. Then I hung them in my garden. This one is on the East side of the fence.

Well -- whilst I was trying so very hard to cut the mirrored plexiglass exactly to fit, I didn't really leave a whole lot of room for expansion, and therefore not only was it a tight fit putting the plexi into the sash... but as you can see from the picture above, the mirrored surfaces became... well, somewhat CONVEX in nature.
Did I mention that I hung the window on the east side of the garden wall... so as the sun set in the west, the sun's rays would hit the mirror, and the mirror would throw off a fist sized laser of light on to the ground in front of the window, and as the sun set, the laser would move across the yard slowly from east to west.
In case you're not getting the picture, here's pretty much how it worked out:

Two guesses as to where I placed the lion statue.
And you got it on the first try, good for you. Right in the path of the @#$%^&* laser.
So last week I was noticing all of the white shards of... well . .. . something all over the ground. I hadn't really noticed them before, but I'm in full on garden mode, so let's just take a peek and OH MY GAWD I HAD EXPLODED THE LION'S FACE OFF and blown his body into bloody bits all over the place.
Of course it took me a few days to figure out what had really happened.
At first I just thought, 'Well that's just what you get for buying a crappy $40 lion and putting it outside all Winter. It just fell apart.....' But a few days later I was weeding around (what was left of) the lion, and suddenly something HOT lit on my hand.
I dropped my digger and looked at my hand. Nothing there. 'What the....?"
I picked up my digger off of the ground and there it was again... "Aaaagh!"
I stared at my hand-held digger like it had suddenly come alive and was poking at me.
I was about to have a very terse conversation with an inanimate object.
No, self-- don't be an idiot. Too early in the season for that. No, this was something else altogether. Recreate the scene... and oh yes, there it is... the 5 o'clock laser beam just as it was climbing up the side of the lion statue.
And that's when I realized that all winter long, as it was freezing cold outside, as the hot convex laser creeped its way up the plaster, warming pieces of it in fist-sized chunks... they expanded and POP! off they went. One shard at a time all over the yard, extending the carnage about 2' around the lion.
My poor, tortured lion.

Anyone know how to make a plaster eye patch? (Maybe out of Bond-o?)
hah. I kill me.
What I wanted was this gorgeous beast, weighing about 2000 lbs. and so far out of budget I couldn't even pretend to wave a credit card at the website with a straight face. Not gonna happen.
So what I ended up buying was this guy (below), about 3' tall for $40, made of plaster. Designed for outdoor use.
Off to the garden you go. Shoo.
Then winter came, and amazingly, our lion statue held up rather well... until Spring, and the sun shifted in the sky.
 |
You see, it all started with these crappy old windows we had stored in our basement. We kept the ones that had the glass intact, I'm really not sure why. I guess we had fantasies about fixing them up. But you know me, I can't let anything go to waste. I'll eventually make something out of it.
And so I did.

So what I ended up doing was taking the glass out of the windows and painting the sashes white, then I ordered a couple of sheets of mirrored plexiglass to replace the glass with.
I used a box cutter to cut the plastic sheets to fit in between the muntons (divided light wood pieces) until someone told me I could use a reciprocating saw. Then I went straight for the circular saw and made my life a lot easier.
I bought the sheets here, btw:
http://www.estreetplastics.com/Plexiglass_Acrylic_Mirror_Sheets_1_8_thick_s/38.htm
Once I had the plexi pieces cut, I caulked them into place and used small tacks to keep them in on the backside of the sash. Then I hung them in my garden. This one is on the East side of the fence.

Well -- whilst I was trying so very hard to cut the mirrored plexiglass exactly to fit, I didn't really leave a whole lot of room for expansion, and therefore not only was it a tight fit putting the plexi into the sash... but as you can see from the picture above, the mirrored surfaces became... well, somewhat CONVEX in nature.
Did I mention that I hung the window on the east side of the garden wall... so as the sun set in the west, the sun's rays would hit the mirror, and the mirror would throw off a fist sized laser of light on to the ground in front of the window, and as the sun set, the laser would move across the yard slowly from east to west.
In case you're not getting the picture, here's pretty much how it worked out:

Two guesses as to where I placed the lion statue.
And you got it on the first try, good for you. Right in the path of the @#$%^&* laser.
So last week I was noticing all of the white shards of... well . .. . something all over the ground. I hadn't really noticed them before, but I'm in full on garden mode, so let's just take a peek and OH MY GAWD I HAD EXPLODED THE LION'S FACE OFF and blown his body into bloody bits all over the place.
Of course it took me a few days to figure out what had really happened.
At first I just thought, 'Well that's just what you get for buying a crappy $40 lion and putting it outside all Winter. It just fell apart.....' But a few days later I was weeding around (what was left of) the lion, and suddenly something HOT lit on my hand.
I dropped my digger and looked at my hand. Nothing there. 'What the....?"
I picked up my digger off of the ground and there it was again... "Aaaagh!"
I stared at my hand-held digger like it had suddenly come alive and was poking at me.
I was about to have a very terse conversation with an inanimate object.
No, self-- don't be an idiot. Too early in the season for that. No, this was something else altogether. Recreate the scene... and oh yes, there it is... the 5 o'clock laser beam just as it was climbing up the side of the lion statue.
And that's when I realized that all winter long, as it was freezing cold outside, as the hot convex laser creeped its way up the plaster, warming pieces of it in fist-sized chunks... they expanded and POP! off they went. One shard at a time all over the yard, extending the carnage about 2' around the lion.
My poor, tortured lion.

Anyone know how to make a plaster eye patch? (Maybe out of Bond-o?)
hah. I kill me.
The amazing things you find at Home Depot.
Ah yes, getting back into the swing of things means, of course, more trips to Home Depot. It's so nice to walk into a place where everyone knows... your name. Cue music.
So, purchases made and walking back to the car.... when I spotted something truly me-ish. My future car.

So, who ever you are with the magnificent Rolls Royce in the Crescent Springs Home Depot parking lot: I'm the one who put the post-it note on your car that said, "I love your car." And I meant it.
Now sell it to me.
So, purchases made and walking back to the car.... when I spotted something truly me-ish. My future car.
 |
| Yes, I love you, too. |

 |
| Silver Shadow, we were meant to be together. |
So, who ever you are with the magnificent Rolls Royce in the Crescent Springs Home Depot parking lot: I'm the one who put the post-it note on your car that said, "I love your car." And I meant it.
Now sell it to me.
Friday, April 12, 2013
Fences Fences Everywhere

Oh how I'd love to have the fence above, but alas... it's not going to happen. I've spent a lot of time looking around at what others have done as far as perimeter fences and gates, how they're embedded into stone (or concrete in some cases) and here are a few samples of what I'm looking at nearby in Covington, KY.

I like the one above, it's about three blocks away from us, and although we don't have the stacked stone base under the limestone, I see this as a distinct possibility to emulate.

Hoop and spear, pretty basic... in concrete.


Above, in limestone, below in concrete. Again, all ok as far as I'm concerned.


Now, this is going to be the part that kills me: finding these end posts. OK, maybe not the one below, but it's pretty darn cool.

Subscribe to:
Posts (Atom)