Thursday, May 28, 2009

Compost bin completed!!


Ok, I finished screwing the tops together and attached them with hinges. It was, after all, a rather simple construction project. The hard part was figuring out what we wanted. What we got was probably a lot bigger than we'll need, but we'll have one hell of a garden in 2 years, I guarantee. In the meantime (while we're not using one side) we can store pots, diggers, hoses and the like in that part.


And it's tucked away in the back of the yard near the parking area ... now I know where I'm going to plant all of those extra hollyhocks-- IN FRONT of the bin!

If you get a chance, check out Julia's Weekly Blog Party.

Project Trellis (Gateway?)

We were walking by a neighbor's home last week in Covington and it changed how we want to gate off our breezeway.

We were originally going to go for a continuance of the dog-eared gate idea, but no more.

We saw this:


I immediately wrote a quick letter and dropped it in the mailbox explaining that I loved the design (and the garden is amazing!) and hoped to hear from the owner on any helpful ideas on how we could completely rip off the design.

Well it turns out, it's the owner's design, and this would not be his first brush with design fame. Apparently his work was featured in an issue of Home and Gardens a few years back for a different property.

He invited us over to peruse his historic Covington home (were those 11 or 12 foot ceilings in there? Wow) and we talked about neighborhood revitalization and the history of Covington, and met a very keen fellow.

(Terry-- if you're reading this, thanks for everything. We'll be back for measurements!)


The design is sturdy and sound, the aesthetics are great.
I'll be working on a drawing and materials list as soon as I finish up the compost bin.

I just love creative minds!!!

From un-compost to compost. (Building a bin)

So how do you avoid putting uncomposted materials in your garden that suck out the Nitrogen from the soil?

Well, first of all, you should know that the Nitrogen cycle only lasts about 2 years. Once the bacteria has finished decomposing the organic material (wood chips in our case) then the chemical cycle puts all that Nitrogen it ate up... right back into the soil. So one thing to do is just be patient and let science do its thing.

The other is to add fertilizer, another is to add a compost bin and use it.

We're doing all three. We've got wood chips for the walkway and paths through to the veggies which will eventually be added into the soil and replaced by a brick pathway in 2 years. We've added fertilizer and are due another round as soon as it stops raining everyday (dilution of the fertilizer) and I'm building a compost bin for the garden.

I've looked online for the plastic bins, the ones that spin and look like a small cement mixer. I've looked at the $150 stackable composter with worms added and the $400 insta-compost mixer at Smith & Hawkins that no doubt consumes more energy in it's production that can ever be saved by composting. I've seen the $50 plastic sheet with holes in it and a wire frame that looks like an oversized tomato cage and wondered why a sheet of plastic with holes cost more than $10.

Nah, sometimes you just want it done your way. OK, MY way.
I wanted a dual bin for a 2 year nitrogen cycle, with breathable sides and pressure treated lumber and easy front access.

Then I saw this:


Bingo. Except that this baby (Garden Gadget Double Bin with two covers) sells for $537.15 at compost.com. No way. Not for a rubbish bin.

Guess I'll just have to make my own.

So it took me quite a few pieces of scratch paper and a general design was born using fence post slats, 4x4's, 2x4's, galvanized screen, landscape fabric and a lot of deck screws.


I've already had to make a few modifications for the lid, but the rest of the design is holding up rather well. A few major design features include that it's higher in the back than in the front so water slopes off, the front bottom 2x4 is designed to be below (or at) the surface level of the ground so that compost can be raked out easily, and the slats that make up the front panels are easily removed through slots in the sides.

Also the back is more wood slats, as it's being set up in front of our fence, and I wanted additional stability. There is no floor... so the worms can come on in and have at it... only the north and south sides have screen and fabric, the divider between the two bin areas is also fence slats.

I'll get better pictures on the actual construction as I finish up the project. So far, cost of materials including brackets, lag bolts, hinges, screws, fence slats & lumber (not including landscape fabric and galvanized fencing... we picked those up for free on Craigslist) is.....

Total: $70.

In the previous post, you can see the sucker (still work in progress, the lids aren't made nor attached yet) in one of the garden pictures.

Garden planting - Un-compost and Nitrogen

One thing we knew we would have a problem with that most people who chop down trees and chip the limbs often forget is that fresh wood chips have a tendency to suck the Nitrogen out of the soil. Actually it's the bacteria (and fungi) use the N to decompose all that fresh new yummy waste material. Actually, and uncomposted material tends to have this affect. It can also effect the Ph of your soil, so you may need to add lime, as we did early on.

We thought we had added enough manure and fertilizer and lime to adjust the soil properly, but I'll tell you, when you put in healthy basil, tomatoes and eggplants and they just sit there for 2 weeks, there's something wrong.

Well, there was.

My dad-in-law bought me a new soil tester while we were at Home Depot last weekend for deck supplies. I was skeptical at first, used to the "take a sample and send it to your local City Agricultural Department and they'll let you know in six weeks" or the chemical testers.

No, this baby is a three pronged, no batteries needed, no chenicals tester. Just make a mud puddle in the ground and stick it in.

Our Ph was fine due to the lime, but the wood chips had sucked out a lot of the Nitrogen our little plants needed to grow.

The "Fertility" was just plain awful.

So we bought a Miracle Grow sprayer attachment and a 10lb. bag (actually 8 smaller bags in a box marked 10#... much cheaper than buying separately) and we sprayed two full feedings on the garden ASAP.


All I can say is... 'Triffids."

The flowers had buds overnight. The eggplants grew 50% overnight. The seedlings that were disguised as weeds perked up. The lettuces turned GREEN. Limpy transplants I had no hope of flowering this year sudddenly stood up straight and saluted me as I walked by.

It was freaky how quick the plants absorbed the Miracle Grow.


I had to take in a batch of Arugula and leaf lettuce because it got too big and started to bolt overnight. The picture below is the harvest. The picture above is the day AFTER the harvest. It's still growing rapidly. And it tastes wonderful.


That's a lamb roast in the background, in case anyone is wondering.


The seeds I had started last week ALL popped up. Before, I was getting less than a 50% germination rate. Now I've got more seedlings than I know what do to with.


All I'm saying is... get a soil tester. Our cost $18 and is worth every penny.

Yard, Fence, Gate.

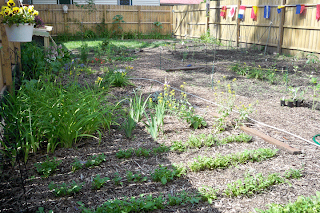
Yeah, I've been hell on wheels when it comes to the garden. Interior trim be damned, I'm out a trim nail gun for the time being and you gotta make tomatoes while the sun shines.

I've about ruined my back, but I've learned a few important lessons I want to share.

First of all, any piece of cr@p land with dirt on it can be a garden. I just came back from Home Depot's garden center and they have a demo out on a concrete slab that is growing lush and beautiful 3" grass on it. On concrete. Yeah. With the right chicken wire, you can have grass growing on your walls.

With today's technology and fertilizers (organic and man-made) there is no such thing as a non-green thumb.

That being said, we had cr@p land with dirt on it. The first time we tilled the soil, we unearthed the dormant weed/grass seeds that had been waiting for decades to see the sun.

The original state, just as a reminder, was this:


Big tree, no sun.


Just a chain link fence, millions of seed pods and the most godawful invasive weed-shrubs you can find (right side of picture, on the East side of the yard.). We've dug them all up, killed them, insulted their ancestry, and we're STILL getting little new creepers coming out of the ground like little fingers of the dead.

We took down the Catalpa tree...


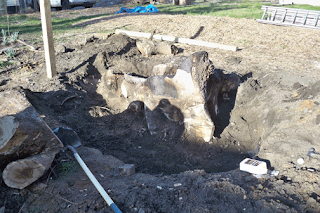
But then we still had the stump... which stayed as a fire pit for over a year.


When we needed to put up the fence, it had to go.


Unfortunately, there was about 70% more to this stump below ground than above it. The picture above is with the stump dug out and half of it already removed.


Then we sank a 12' 4x4 and put up the rest of the fence.

OK, now to present time: We have the new dogeared wood panel fence completely up in the back yard. The elaborate sliding gate we had planned on has been put on hold. We needed a gate pronto, and we we're having a hell of a time finding the right tracks, wheels, etc. for the earlier design, so that plan is on hold for now. The good news is that we can re-use the same materials if we need to rebuild anything.

So we settled.


We took a regular 6x8 fence panel, reinforced it with metal nailers at the corners, then used 2 turnbuckles to keep the panel square and used it for the larger panel on the south side of the gate, added mojo hinges, a cane bolt, a latch and a $30 wheel with a spring. This one swings outward.

The other gate panel had to be built from scratch, with 2x4 PT lumber and individual slats we'd salvaged from the other panels when building the rest of the fence. We used one 2x4 diagonal cross brace and another turnbuckle. It swings inward.

It's not great, the right side is a bit wobbly still, but it works.

Now that we have a secure garden, it's on to planting. I think that's worthy of another post altogether.

I've been very very busy.

*PS a quick note on the first image in this post... I made 2 shelves with leftover fence rails on the gate by cutting the slat to size and screwing it sideways onto the gate panel structure supports with 4-5 screws each. Makes a great place for seedlings, light tools or a wine glass :-)

Thursday, May 21, 2009

Quick note to anyone intersted in Downtown Cincy Property

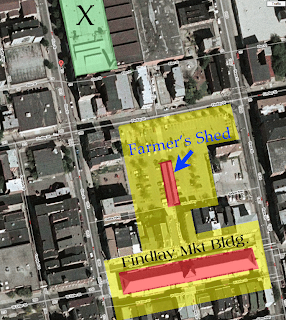
We just got an email from Nancy, one of our best gardening friends who runs a regular stand every weekend (Saturday) at Findlay Market in downtown Cincinnati. She asked that we pass the word around, so here goes:


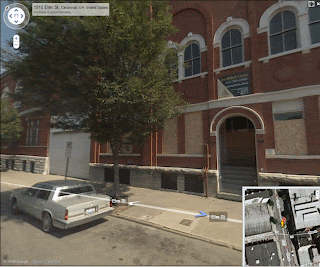
"Other news: Orton Development (friends of my family) has bought and is developing a major mixed-use building at 1910 Elm Street, just north of Market. They will host an open house/tour of the building on
(corrected date!!) Thursday, May 4, from 3-6 PM, and asked me to help spread the word. It is thrilling to have a national urban developer putting resources into our neighborhood, and we should do whatever we can to encourage this kind of activity. Mention it to anyone who might be interested in City property."

All I can say is Wow. We've driven by this building and thought about the wonderful opportunities within. Inside garage parking, proximity to Findlay Market, rooftop garden and patio.... unbridled potential.

Check it out: (click image for larger view)


Tuesday, May 12, 2009

Mother's Day gift to myself: Window sills.

Oh come on, like I was expecting roses or something? OK, perhaps it was just a coincidence on the date... whatever.

So, we had purchased some new oak window sill boards from the Covington Reuse Center a while back, but they've been sitting in the basement ever since the "I'm an idiot" moment with the compound miter saw.. you know the one where I measure the sill width, add 2" for an overlap edge on each side, measure the depth and the not-so-90-degree angles in the back, and then carefully, but boldly go ahead and cut the whole overlap edge clean off. It's been about 3 weeks since then. Time to try again.

This time with much more success, much less embarrassment.

First thing's first: after the first gobstopping chopping error, I figured out a rather decent way to get the sills cut correctly. This is probably so old school for many of you, but for me, it was a first time, so bear with me.

I originally was using a square piece of paper and folding the side until I matched the angle perfectly, then squared up the paper onto the wood, drew the line, then... well, I cut the cut the ^%$#@* overhang off, but at a perfect angle.

So here's a better way. First, I measured the sill opening at the outside edge (farthest away from the window pane). Then I took my square and checked the left and right back corners closest to the window pane to see if they were square. If they were square, it would be an easy 90* cut, but me, I had no such luck. I built these window frames.


I put the square in the corner, then measured the distance from the edge of the square to the drywall on each side. That's the measurement to subtract from the original sill opening to get the length (and therefore the angles) of the back ON THAT SIDE. Mark the measurements on the sill, and cut, remembering to NOT cut off any overhang you want to stick out to the left and right side of the sill. Using the circular saw to cut through the bulk of the oak, I then used a jigsaw to cut the inside corners out.


On the underside of the sill board, the wood was pre-routed out to fit a 4" sill (A 2x4 and 1/2" drywall) but as this wasn't always perfect (what is?) I had to double check. One sill had to be routed out a 1/4" back to the sill would fit. Another one was off just an 1/8" so I knocked off the drywall instead.


The important thing to remember is that the distance at these corners is the measurement you need to cut out of the sill to make a snug fit at the back. Cut off too much and you'll be compensating with caulk... cut off too little and you'll have a gap between the overhang and the drywall.

I chose a 2" overhang arbitrarily.


The first one took a few extra cuts and some sanding to get the perfect fit, but once the first one was done, the rest were fairly routine and easy.


All that's left is a few coats of polyurethane, some construction adhesive, some shims to make them level, and a couple of brad nails to attach.

Now that we've got three more days of rain expected... I have to figure out what to do next. Since the floor trim needs to be cut in the breezeway outside, that's out.

Looks like stairway caps it is then.

Monday, May 11, 2009

The old double concrete sink in the basement


I was beginning to think it was an anchor holding the house down. I mean, it's heavy enough, you know?

Anyway, after doing a little research, like here, I discovered that some people actually WANT these things.

I think this one is concrete, and not soapstone, and has no legs.

If you want it, or know someone who does, let us know, otherwise it's headed to the Covington Reuse Center or Criagslist.


I need the room down there to get to the new sink we installed just behind it. Grrrr.

It's currently covered in a fine dusting of sawdust, so that's not the real colour.

Friday, May 8, 2009

Urban Bio-Diversity


So, for fun, I've been cataloging every critter that comes into, lives on, or flies over our little postage stamp in urban Covington. I'm frankly impressed.

When I was very young, I was very much the junior naturalist. I tramped far and wide in my semi-rural neighborhood through hundreds of acres of woods, along streams and ponds and the like. I was always looking for different species of critters. And I saw a lot (there wasn't much else to do).

So, when I say that I may have seen more bird species in 9 months over and on this postage stamp than I did during my childhood, it means something.

The latest was a Rose-Breasted Grosbeak. My first.

We've also added a mocking bird and a tree swallow to the list. I'm sure there will be a number more as we go through summer and fall migrations. I theorize that we're seeing more birds than when I was young because of a number of factors. More raptors due to the DDT ban, more birds due to habitat preservation and feeding stations, and probably more birds in general due to the efforts of Ducks Unlimited and various conservation groups and birders. In any case, for the price of 20 lbs. of sunflower seed and a like amount of generalized bird seed, this is pretty cheap entertainment.

So far, here's the list of all non-bug, non-pet critters we've spotted:

Canadian Geese
Mallard Ducks
Turkey Vultures
Red Tailed Hawk
Bats
White-footed Mice
Squirrels
Opossum
Raccoon
Chickadees
Mourning Dove
Rock Dove
Downy Woodpecker
Robins
Junko's
Grackles
European Starlings (invasive)
English Sparrows (invasive)
Chimney Swifts
Blue Jay
Garter Snakes
Crows
Carolina Wren
Cardinals
Brown Thrasher
American Kestrel
Rose-Breasted Grossbeak
Mocking Bird
Tree Swallow

Kinda cool, if you ask me.

If you haven't seen Hooked On House, check out Julia's Blog Party...she's hooked on porch swings .

Monday, May 4, 2009

Forgive Me...


...For I have sinned.

Last week, I was shopping for dinner late, and (forgive me) I saw a pretty ribeye on sale at (I'm so sorry...) Kroger's. I was tired and not thinking straight, so I bought two.

I guess you have to wander every once in a while to realize just how good you have it. You see, my butcher is Bessler's Market. I have bought my best steaks there, over and over. The beef is raised locally and they age it. They also source their poultry from just down the road, as well. But I digress. I'm talking about beef and how I screwed up.

So, anyway, I bought a steak from Kroger's. What a mistake. It looked fine, but the texture was off and the flavor was bland. Fortunately, I had a good rub with it. For the same price, I could have had a steak to remember from Bessler's. Give them a try. Tell them Mr. Inch-and-Three-Quarter-Porter sent you.

As part of my penance, I'm going to give you my recipe for cowboy steaks and watercress salad. I ripped this off from Bobby Flay, and changed it modestly. Here's what you need:

(serves 2)
1 1.75" Porterhouse steak
1 tsp garlic powder
1 tsp dry mustard
1tsp finely ground espresso or Italian roast
2 tsp salt
2 tsp thyme
2 tsp chipotle powder (hot paprika, ground smoked anchos, or even chili powder will work)
1 tsp ground pepper
1 tsp olive oil to finish

Mix the ingredients for the rub (except oil) together and taste for heat. This should be on the high side of spicy. It will mellow on the grill. Rub into the meat, both sides. I like to add the olive oil to both sides to activate the spices a bit more. You can do this up to one day in advance, but at least 1 hour before cooking. If it will be more than one hour or so, cover and refigerate. If you can't get a porterhouse, a good thinck ribeye works too. Bone in is great, too, but you'll want it 1 3/8" not 1 3/4".

One hour before cooking, pull the meat from the fridge and allow to come up to room temperature. If it's on a cold plate, switch to one that's room temperature. After 40 minutes, start a fire in the grill. I prefer the lump hardwood style charcole. I also prefer using a charcole chimney--it makes for cleaner tasting food and lights fast. When the coals have mostly developed white edges, dump onto one side of the grill and place to cooking grill back over the coals to heat. Make sure both sides of the grill should be clean and hot

Grill steak for roughly 6 minutes per side. The fire should be hot so keep an eye on the steak. A little flame is good. Inferno, not so much. If it flares too much, move it off the fire to the other side of the grill for a moment. After you've given the steak 12 minutes, if you think it was pretty cold when it went on the grill, stand it up on the bone end, over the fire for 2 minutes. Then move the steak to the over side of the grill, bone facing the fire side. Feel for doneness. It should be very rare at this point. Let the steak sit for another 4-6 minutes on the cooler side of the grill turning after 2 minutes. Test for doneness after 4 minutes. You may want to give it another minute per side to crisp up the crust but that's up to you. Let the steak rest for 5-9 minutes on a warm plate.

I like to serve this with a watercress salad with tomatoes, blue cheese and a dijon-shallot-sherry vinegarette. I also like to grill some new potatoes that I blanched, then seasoned with salt, pepper and olive oil.

This is a keeper. Trust me.

And if you're anywhere near Covington, try Bessler's Market. If you want my custom cut from the butcher, make sure you get there before 4:30.

If you came here via Julia's Blog Party, welcome! If you've not visited Hooked on Houses, give it a gander.