Seems we just felt a minor earthquake in CVG.
It's been what, 2 years since the last one?
You know, we have earthquake insurance.
Folks said it was a waste of $, but this is the second one since we purchased it.
Time to go check for cracks in the drywall....
Thursday, December 30, 2010
Tuesday, December 7, 2010
More Central Vac
So, to review....
Two years ago I put specialized Central Vac PVC pipe into the walls, under serious time constraints, right before we put up drywall. I had no idea what I was doing, but it only cost about $100 for all of tubing and fittings, about half of which stayed in a box down stairs, unused.

Note: Vacuum tubing is different from plumbing tubing. They aren't interchangeable. In any case, even with a number of screw-ups, it was pretty easy diy (given a bit of head scratching).
Note that you'll also need to run low voltage wire with the vacuum tubing. This is what actually trips the signal back to the vacuum to turn on when you insert the tubing into the wall.
You'll want to tape the wire to the tubing to keep it where it belongs and away from drywall screws, or anything else that can snag, stab, cut, etc. Recommended is that you tape the wire to the backside of the tubing, away from the drywall, in case some time down the road you decide to hang a picture or attach a 2x4 right in front of the wiring.

For the low voltage wiring, you want to create one big loop circuit that can be closed by touching the 2 wires together and closing the circuit. (This means one big loop going around to each vacuum inlet, leaving enough wire at each inlet location to wire the cover when it comes to that. Be generous.

Eventually you'll need to attach the wires to the back of the cover plate and snip off the excess.
When planning out the tubing, you want to try to run the tubing with minimal bends. The less bends, the less likely something will get caught in there.
You'll also want to plan out the locations of the inlets so that you can readily reach every corner of the house with a 30' hose.
We dry fit the entire assembly together before we used the PVC cement to connect the fittings together. If a fitting is easy to access, but also not likely to be disturbed, cement is unnecessary.
I'd say the toughest part for me was not knowing exactly how to terminate the tubing at the wall inlet locations before the drywall went up, so when it came to that, I just left the tubing so it would extend past the drywall a few inches. (Better to have too much sticking out than not enough).
I ran a 90-degree or "Y" sweep fitting from the vertical main line (going up through the house from the basement) to where I wanted the inlet on the interior wall. We put the inlets about 18" up from the floor, but realistically, you can put them anywhere you want, even in a ceiling.
If you keep the front edge of the 90-degree sweep fitting about 1" from where the drywall will be, you'll be glad you did. I dry-fit a short length of PVC to the main pipe and let the drywaller do his thing around it. Later on, you can easily remove the PVC and fit almost any inlet type to the pipe with a few cuts and connectors. The reason that extra 1" is important can be seen below. Note that the inlet fitting and connective PVC is rather protrusive. You'll want the extra room.

The result, as you can see, is an inlet that sits almost 1" from the wall. Not acceptable. Now, we could put a piece of trim behind the inlet, but it still would look lame, albeit a more finished kind of lame. So, what to do? My solution was to fabricate a shallower fitting that will allow the inlet to mount closer to the wall.

I found a reducer that would fit snugly to the inlet, but which would easily fit inside the PVC elbow. I then glued a small ring of PVC on top of that fitting, essentially making a collar that will allow the inlet to tightly fit inside the PVC elbow.


After getting the CV PVC tubing squared away, and all the inlets in place and anchored, it was time to install the vacuum unit. Step one, find an appropriate place to mount the unit. I decided that it wouldn't be worth the effort to try to mount a bracket to the weeping stone foundation, if it was even possible. So, I decided to suspend it from the floor joists. Of course, I had to scrape any spray foam insulation off of them.

Then, I screwed two 30" 2x4's to two joists perfectly plumb. Then, to those, I screwed a hefty piece of 1"x 14" pine. Plywood would have been fine, too. Then I measured from the attachment point on the vacuum to the top of the unit. I then added a couple inches to that and then used that as the minimum distance from the joists that I could screw the mounting bracket.
Now, we got an Air-Way system built for a 8000 sq' home (almost 4x more than needed--OVERKILL!!). The motor is huge so it has to work less hard and thus will (theoretically) last forever. You can vent these units outside, too, to really cut down on allergens in the house. Unlike a regular vac, you aren't blowing dust around the room as you vacuum. Dust goes in, but air isn't exhausted into the room. We hung this unit from the mounting bracket.
Here you can see the unit hanging in front of the mount I created from the 2x4's hung from the above joists. It hangs on the board like a picture frame. It's not very heavy at all.

After hanging it, it's just a matter of wiring the low voltage to the vacuum and attaching the CV PVC to the unit. Remember, that wires go to each inlet and when the hose is connected, it allows you to turn the unit in the basement on or off from the vacuum hose handle.

BTW: When you run the last run of PVC to the vacuum unit, it is not really necessary to cement the PVC together. In fact, if there is a blockage or a need to move the unit, it's just a matter of detaching either clearing the pipes or adding whatever is necessary. Almost all the tubing in the basement is dry fit together.
The final step is to either run the vent outside, or put a muffler on it for sound dampening.
It's a pretty easy install and a HUGE improvement. There is no comparison to a standard vacuum unit.
Even for a retro fit, I'm thinking this makes sense. Basically, if you can get tubing up and around to enough locations so that your 30' hose will reach all the corners, it's a go. You can mount outlets on or in walls, in or on cabinets, floor trim, or the floor itself.
Kitchen installation and first floor is usually pretty easy. As you go up, it's trickier, but you can even run the tubing up the cold air return. You can also cut the wall in a closet if you have to in order to run tubing and low-voltage wire.
Addendum from DW:
OK, here's the cost breakdown:
Our vacuum unit ~$500
The kitchen 'magic dustpan' $40*
The wand and the beater brush unit, stair tool and accessories cost: $270
And the most surprising part of all... the vacuum hose was about $225.
"WHAT? The hose is $225??" sayeth the Wife with the look of total "WTF" on her face to the poor salesman (who was not so poor after we left.... ahem.)
Yes. The HOSE has electrical wires spiral ling all the way down the 30' length, from end hose connector that goes to the beater brush and wand (This is the electrical connection that comes from the wall that makes the brush spin. Otherwise, all you get is a sucking hose) to the wall where the wires, once you plug in the hose to make the connection, turn on the unit in the basement.
So if you are planning on getting a CV unit, plan on the hose and the brush & wand stuff being about half of the cost of the setup.
*magic dustpan. This almost requires a demonstration. Chance for the wife to make a video. :-)
Old Chandelier Cleaned and Installed
Yay for Beth The Covington Historic Preservation Officer!!
Beth is a goddess. A kind hearted (a.k.a. GENEROUS!) kind of gal who knows how to make a person feel honored to be a friend.
Oh, and she gave us one of her totally fab chandeliers.
This is the solid brass chandelier pulled from her home: (She's doing a renovation of her own and the old lighting wasn't a proper match for the design of the home... and soooo.... FREE GIVEAWAY!!)

OK, it was dusty.
And Dirty.
And pretty much encased in 80 years worth of black creosote.

OK, fine, not creosote. More like a crystallized fine black crust.
I took it apart outside and started cleaning it the day we brought it home. There were 20lbs of crystals that needed dusting, but that wasn't the hard part. In fact, that was the easiest part of it all.

One I pulled the chandelier apart into the myriad brass pieces, I started polishing the stem by hand. And by toothbrush. And by sponge, and by stick and brick and hammer..... ugh. It was a lot more work than I expected.
A lot more crevices. Tiny imperceptible nooks and crannies. Using Brasso. (Oh, and DO NOT USE Tarnex. Apparently it turns brass green.)
On some of the finer crevices I actually had to drill out the black crud with a small chisel (engraving) tipped Dremel tool before polishing it. Whatever the black stuff was, it was like a thick layer of lacquer that the Brasso just can not penetrate. In every single crevice of every piece.
Using this:

Before:

After: (same piece)

From beginning to end, it took about 5 days, a lot of brass polishing wheels and small nylon Dremel brushes that NO ONE carries anymore (had to special order them from Dremel.com since everyone's going oscillating/cutter accessories and they just don't have the shelf space for polishing anymore. Grrrrr. )
 This brush is also what I used after chiseling.
Once it was polished and assembled, we then had to worry about the weight.
We had a small 5 lamp light hanging from the ceiling that weighed about 5lbs. I was not sure that what we had installed in the ceiling was rated for a chandelier that weighed 40-50lbs.
We decided to go (obviously) towards overkill.
We cut out a chunk of the drywall in the ceiling to try to get a look at what we installed for the old lighting. For this reason alone, we also decided that we were going to need a 2' decorative medallion on the ceiling. (We also did not have the original chandelier cap, either). For this reason, we also needed to replace the threaded nipple from which the chandelier hangs. The one we had was no where near as long as we would need to attach to the bar, through 2 medallions, and through the screw cap that held the chain. I think it was 3" long when we were done.
After cutting the hole, we decided to play it safe and get a new spreader/hanger bar and ceiling box to rewire and support the weight of the chandelier. We got one similar to this one, but instead of needing nails or screws to attach to the ceiling joists, we got one with spikes on the that expanded by twisting the bar outward and it embedded itself into the joists.
One important note to this was that because we attached 1x3" wood slats to the bottom of the ceiling joists to smooth out the levels for the 5/8" drywall, we propped up the spreader bar on blocks of 2x4 to make better contact with the joists on each side.

Once the bar was installed (rated for up to 80 lbs) and rewired, it took both of us to hold the darn thing up close to the ceiling (in between 2 ladders) while one of us did the wiring, the other had to hold the mass and stay balanced and unmoving. And we had to install the medallions first, then connect the wiring and support cable through the medallion. What a PITA.
But in the end, it came together beautifully just in time for Thanksgiving.

The picture does not do justice. Damn it's sparkly.
Thanks, Beth. :-)
Monday, December 6, 2010
A Damn Good (and easy) Fish Chowder Recipe

You'd think that the best fish chowder in the world begins with fish.
It doesn't. It begins with bacon.
No, not any of that salted, smoked, honey cured, messed with junked up bacon. I'm talking pig plus nada. Just good thick sliced bacon. (If you're in the region, try Bush's bacon at Findlay Market in Cincinnati. You will not be let down.)
And fresh parsley. If you only have dried parsley, just go get the car keys and go out for burgers.

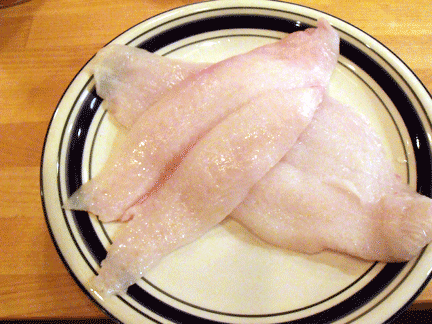
Fish: Fresh. Haddock is good, Cod is fine, Sole is acceptable. Even Monkfish is an interesting twist, be we went with Haddock, about 1/2 lb. for two servings (one fillet).
OK, if it smells like fish, don't buy it. People who don't like fish usually have had old fish. I have always found it odd that when people refer to something as being 'fishy' it means = 'bad'. Old fish, politicians, used car salesmen... and week old fish.
First, fry 3 strips of bacon. Remove from the pan and try not to eat all of it.
Then chop a large onion, and saute it in the bacon fat until translucent.
Add 2 C. chicken stock (homemade, preferred- low sodium is a good second best option) and 2 C. clam juice over medium heat. Add one large Russett potato, peeled and cubed, a few sprigs of fresh thyme, and a bay leaf.

Cook until potatoes are tender... about 15 minutes. To add thickness, mash a few up against the side of the pot.
Add 1C frozen or fresh corn niblets. (Do not use canned corn. It tastes too sweet and mucks up the chowder.)
Add 1/3 C of cream, more or less.
Sprinkle a pinch of cayenne.
Add 2T dry sherry. Again, same with the parsley. If you don't have it, make something else.
Rinse the fish and pat dry with a paper towel. Do not rinse with lemon. If you feel you need to add lemon juice to 'purify' or 'sanitize', or 'completely ruin the flavor of' the chowder'... you likely have old fish.
Bring the mixture to a simmer, then reduce to medium. Add the fish to the pot; no need to cut it up, it should flake apart as it cooks. It shouldn't take more than 4-5 minutes.

When the fish flakes apart, you're done. Add pepper to taste (the clam juice will provide more than enough salt, do NOT add more.)
We got so excited at this part we forgot to take a picture of the final product. Sorry.
Serve into deep bowls and garnish with chopped parsley and bacon. Serves 2 heartily.
Eat and make yummy food noises.
Subscribe to:
Posts (Atom)