Wednesday, February 11, 2009

Another windy day...

Maybe some more branches will come down, eh?


Sheesh, no wind damage, no branches.... just this:


It's actually a double rainbow, too. Ther's the beginnings of a second off to the left and low. Maybe there IS gold in Cincinnati!!!...... nah.

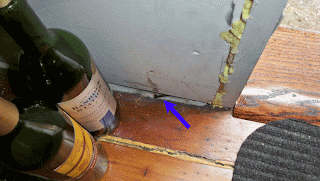
The Doorbell

A few hard lessons learned on this one, I'm afraid.

First of all, if you don't have a doorbell installed in a three story old brick home, the pizza delivery guy will get a really annoyed look on his face when you saunter on down to the first floor, open the door and say, "Hey, how long have you been standing there?"

It's not like we didn't plan for a door bell. We planned on a wired bell, (because all of the wireless ones just looked like cheap cr@p from a lead infested plastic plant in China) so we bought a wired bell and transformer. You need all three parts, actually, the bell, the transformer and the button to make the electric connection that tells the bell to go ding-dong with the power from the transformer.

But more importantly, before the drywall went up, we ran the wiring. If you're installing a wired bell, you need to run the wire from the doorbell button to the transformer, then from the transformer to the bell. Because there are two wires in any door bell (low voltage) wire, you're actually creating an electric loop.

We ran wire from the basement (location of the transformer) up to the doorbell through the inside of the brick wall before we replaced our kitchen door, chipped through a brick and knocked out enough brick to hold the recessed button and wire. Elegant solution and no exposed external wires. So far so good.

Then we ran a wire from the basement (transformer) up through the ductwork in the kitchen, into the ductwork of the laundry room and over the top of the dropped ceiling into the hallway of the second floor.

(We actually carried the bell throughout the house, shaking it in different locations to make sure that you could hear it from wherever you might be in the house. The second floor hallway turned out to be the winner, although you really could hear it from just about anywhere. )

Of course, we installed the doorbell wire the day before the drywall was to go up, which meant we were in a bit of a scurry. (I'd normally use the word hurry here, but we were much more like insane panicked rodents than normal human beings. It seemed appropriate.) It also meant we were not in our right minds and did not test the connections of the wires.

You see, we secured the wires to the joists and 2x4's with a staple gun.

We think this is where we went so badly wrong.

You see, it doesn't matter how carefully you lay your wires throughout the house, how deftly you poked and prodded the continuous current into nooks and crannies so as to be uber-careful ensuring that the dry wall screws have no opportunity to nick or cut the delicate wires underneath -- WHEN YOU SHORT CIRCUIT THE WIRE WITH EVERY METAL STAPLE YOU USE TO HOLD IT IN PLACE.

Yeah, the wires were completely useless. All that work for nada. Both wires to and from the transformer were shot.

Time out. Start over.

So now, there's no way in hell we can manage the doorbell on the second floor. It would just cause more damage to the drywall than I want to try to repair at this point, and since we did test the door bell all over the house, leaving it on the first floor should still make it audible from the third.

We realized the bell wasn't going to work before we installed the new kitchen door, so at that time, I tucked some wire into the brick and let it hang to the exterior of the house and just left it there. The other end was attached to the spool, and has been that way for weeks now.
Since the elegant exterior brick wiring was kaput, we moved the transformer away from the breaker box to be situated under the floor joists of the kitchen in the basement so the wire going from the doorbell to the transformer was only about 10 feet. On the exterior, I had to chip away the mortar between two bricks, enough to tuck the wire in and seal it up with caulk.

On the inside, we drilled a small hole into the floor behind the baseboard and into the basement to the transformer. So far, so good.
Now from the transformer to the bell mechanism: where to put it?

We thought the best place to put it was in the living room, as it's close to the stairwell, and that's where sound should travel the best. We figured we'd just put it on the wall on the side of the closet, run the wire up on the inside of the closet, then punch through to the outside and attach the bell mechanism about eight feet up off of the floor.


Anyway, I've run the wire from the transformer through the ceiling joists in the basement alongside the other electrical wires into the area just underneath the closet, I'm just not sure where to drill for the hole, making sure I don't hit a joist. I guess it's time for 'knock-knock, joist there?'

Oh, and as a second thought, why put the bell on the outside of the wall? It's not like we have a solid door on the closet, maybe we'll just put the bell inside the closet and leave it there.

We'll see.

btw: Here's a flash from the past, a true before and after pictures of the living room closet:


Thursday, February 5, 2009

So, What Are You Waiting For?

Right now, there's a window of opportunity for a handy, enterprising person or couple who want to own a home. It's not going to be here for ever.

There's a neat home here owned by the City of Covington with off street parking and a winter-time view of Mutter Gottes, the Ascent, and even Cincinnati's sky line. It's for sale (more info here). Now, I'm going to assume that a qualified buyer (no flippers considered) might be able to negotiate a better price, say $32,000 for this property. Not unreasonable guess or presumption in this market right now. That frees up money for them to go get another property renovated.


The property needs work, but a smart owner is going to want to do more. Here's why:

Incentives.

Big incentives.
First, there's a CARD loan/grant of $6000. It's available upon receipt of CoO and yours to keep if you stay in the house for 5years.

Next, there's as much as $25,000k in low or no interest money from the City available for qualified buyers/renovators.

Next there's up to $15,000 (under consideration as a true credit, currently it's "only" $7500 and it's really just a 0% interest loan) in refundable tax credit. It seems that this would apply to a full rehab of an uninhabited building as well as just the intial purchase, since a full rehab is de-facto "building a house" (check with competent authority on this).

That's as much $46,000 in potentially free or low/no interest money that you can dump into a property that you can buy for less than the brick is worth.

Financing may be tricky initially, but many banks will allow you to use any of those subordinated loans as part of your collateral during rehab.

Here's the kicker, right now, with no special deal, you can then refinance at 5.15%. That's a mortgage of about $540/month on $100,000. Ad taxes and insurance and you're into a neat place for $700/month, with equity. how much are you paying in rent plus renter's insurance?

But wait! There's MORE! If the Feds find a way to drop rates to 4%, you might be refinancing at around $440/month. That's a lot of house for not much money. You may not have to come up with much of a down payment, either. If you're handy, you don't even need to borrow as much as I theorize, either.

But here's the thing. This won't last forever. It'll take some time to acquire the property and arrange the loans, and your negotiating position right now is as good as it's going to get. It won't take long for others to figure this out.

Get on it!

There's contact info here. If you have other questions, we can probably give you some guidance. If you need step by step instructions, that's what this blog is for. For what it's worth, I'm of the opinion that the property in question is an easier project than ours.

N.B. We are not your tax or financial advisor, nor your mortgage broker. You are responsible for doing your own homework and seeking advice from a qualified professional on all tax, accounting, mortgage, and investment matters. Don't rely upon us or this blog.

Monday, February 2, 2009

Mural is going up in the diningroom


Yes, I love Studio Vertu, home of the marble king and all his kingly marble do-dahs.

We started attaching the SV Mural last night, and it's starting to feel a lot more like home.


Update: the mural is finished!!


It's a mural of Alessandro Allori's Venus and Cupid.

Ice Damn


I wake up each weekday morning, get out of bed, go down to the kitchen and get the coffee started by 7 AM. This morning started out a little differently.

This morning started off more like this: bare feet on cold wet carpet.

"Hon, I think the waterbed's leaking."
"We don't own a waterbed."
"[expletive]!? "

Yup, our insulated roof is so insulated that the snow on our roof is barely melting. Barely, I say, but melting. We have one of the few houses in the area that still has snow up there. Ah, the benefits of tight spray foam insulation.

Now the problems: because we have been fluctuating between 13 and 40 degrees Fahrenheit each day, the sun melts some of the snow, it runs down the metal roof, and as the sun descends into the west, that trickle freezes up, creating an ice damn. Yes, I did that on purpose. It is forever spelled that way now. Get used to it.

We have an ice damn on our roof. At least we did last night.
Now it's in our bedroom.

It's prettier when it's OUTSIDE.


Box-gutter guys/roofers: We're taking bids to run the ice barrier and line the gutter with rubber. Feel free to contact us.

Sunday, February 1, 2009

The final solution: The tub.

So after inserting the spray foam up through the ceiling in the kitchen, into the tub crevice...
it seems we finally have a winning solution.


As a reminder, this is the link to the *before* video.

I AM SO HAPPY.
I think I'll take a shower.

Or a bubble bath.

Addendum: If you're building your own tub surround, installing a new tub or whatever... don't wait until the drywall is up to make sure your tub isn't a squeaky annoying project waiting to eat up another 3 days of your life. Get in the tub and walk around. Make sure it's seated well and if it's not, get the spray foam.

Or better yet, follow the directions on the tub insert and install the damn thing in concrete, avoiding all of this mess in the first place.

Ah the 20/20 hindsight.

Friday, January 30, 2009

Argh. Still fixing the squeaky tub.

So this time I went through the hallway.

Used a stud finder, measured for the hallway trim, cut away the drywall and what did I find?

A whole mess of plaster stuff.


Yes, it seems that our plumber really
laid in the durabond nice & thick around the outside of the tub after it was installed, which is of course why it doesn't creak around the outside rim of the tub, just inside that rim.

I thought I could chip away at the mortared in rim, but I had even less room to maneuver than from the closet.

We just couldn't chip through it.

The the DH has a flash of brilliance. Remember the speaker installation? Well HE did. The second speaker we cut into the ceiling was a bummer because we ran into the plumbing. The plumbing for the... wait for it... yes! The Bathtub.

Hell, we already had a hole cut and everything.

So we took the speaker back down, poked and prodded with a wire coat hanger and made sure we had enough room to poke some foam in there. It looked good, so I made a similar 'apparatus' and taped the clear tube to the wire hanger, stuck both into the hole, and then attached the can of foam. (*This time we used uber-expanding foam just in case.)

That white plastic thing behind the PVC (with the fins) is the bottom of the tub.

I stuck the tube and the wire all the way in and basically let it empty itself. When I thought the can was about 1/4 full, I started pulling the tube out of the hole.

The thought is this: if it over expands, it will run out of the sides and towards the edges of the surround, and there's lots of space under the tub wall that faces into the bathroom (the side that you step over to get into the tub.) At least that's the plan....


I'll let you know how it goes after it cures overnight.

Squeaky tub solution: part two.

I checked the underside of the tub this morning, and the foam has solidified. I was a little concerned about this, as the foam came out of the tube last night was oddly very liquidish. I think forcing it through the tube changed the composition and the normal immediate exposure to air. I think it took a bit longer than normal to solidify, and I don't think it rose as much as I would normally expect it to.
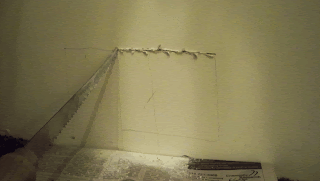

But the real test is the squish test.


Looks like I'll be doing a part three through the drywall in the hallway. At least this time I don't think I'll need the long tube apparatus. It only seems to squeak towards the drain and I'm guessing I just didn't give the foam enough time to build up under that area. I said before, it came out very very slowly and I was working blind.

But it's a good start, and much much better than it was before.

Off to Home Depot!!!!

Thursday, January 29, 2009

Squeaky tub solution: part one

Hopefully there won't be a part two, but I've learned a thing or two about optimism: It's doesn't help one iota when working on a project like this. In fact, it's usually detrimental.

I can't count the number of times we used the words, "Well, this should be the last of it" or, "This is the last trip we'll need to make to Home Depot today..." As soon as you say those words, you're done for. We really try not to say things like that anymore. It's just bad luck.

So anyway, back to the squeaky tub.

I decided to go in to the wall opposite the plumbing, which is conveniently in our bedroom closet. We'll be covering over the hole with 7 1/4 trim, so I made sure not to cut the hole too high.

(I also checked for studs with a studfinder.)


Once the hole was cut, I took a peek inside. Seems that the plumber used some Durabond mix to prop up this end of the tub. That would need to come out with a few whacks from a hammer.

And it means I had to double the size of the hole. No problem.


Once I got to whacking away at the plaster, I realized why it was there. Apparently one of the small legs on this end of the tub had broken off. I don't think that contributed much to the squeakiness, but it did need to be re-supported.

I also noted that the underside was mainly clear of obstruction, and I took my 4' stick (actually a reflector stick for marking driveways or something like that) and poked around to make

sure I could get it in later with the apparatus attached.


"What apparatus?", you ask.
Lemme tell you:

1 can of Great Stuff.
5 feet of 1/4 clear tubing from the plumbing dept.
Electrical tape
stick and a flashlight

I pushed the tubing over top of the nozzle for the Great Stuff about an inch, then taped over the end to keep it from slipping off. Then I taped the end of the tube to the stick and wrapped it a few times in different places to hold it on.
Then I stuck the whole shebang as far in as I could go under the tub, then attached the can and let her go.

It came out S...l...o...w...l...y.

I let it seep out and about every 30 seconds, pulled it back towards me about 2"-3" and just let the can empty itself out under the tub.

Since I was completely blind as to how much was being deposited under the tub, I have no idea if this worked. The only way to know is to let it cure overnight and pop on into it in the AM and check for squeaks.

If it still squeaks, we can cut into the surround via the hallway outside the bathroom and try again.

We're putting up trim there too.

Wednesday, January 28, 2009

Squeaky tub problem

OK, I love the new tile surround, but I absolutely hate the squeaky-squeaky of the tub floor. As I re-read the installation instructions from Sterling, it specifically says to install it in a wet concrete base and let it cure.

Well, for us there is no concrete base. Our plumber must have forgotten that part.

Here's what we have to deal with:


We plan on fixing it with a hole saw, a can of Great Stuff, a long plastic tube and a stick.

Oh yes, there will be pictures.

I'm sharing this with the Hooked On Houses crew. They've always got fun stuff going on. Make sure you check the main page of RehabOrDie to see "The Solution" and "Part II" to this problem.

Guess which branch will fall next -- Win free lumber!!!


Here's a compilation of the menaces in my neighbor's yard(s).

As you can see, most of the branches from the tree closest to our house (on the west fence) has already been heavily cut back since Hurricane Ike hit and downed most of the branches in our yard.

The tree behind it, on the North side of the yard, landed most of its branches on top of the yellow house, but there's still more to go.

We're still hearing creaking out there.

So here's the contest... pick which branch goes next and win a pre-cut and stacked pile of lumber from the last fiasco.

Pick your color branch, or pick your own.

Good luck!

And d$%# it all... another branch fell in the backyard.

Sonofa&*%#@!

Just when I thought we were done with the trees falling into the back yard, whammo.
(See previous posts here, here and, here)

Who knew?

Snow and ice built up on a DEAD tree and they tend to fall down, ya know? Oh, wait... I knew.


That's why I suggested to our absentee homeowner neighbor with the deadish tree in her backyard that keeps dropping branches into ours that while she had the tree trimmers cutting the DEAD TREE off of her OTHER property (yellow house at the end of our back yard) from the LAST time the DEAD TREE fell into pieces.. that she take the whole tree down.

Nope. She didn't want to pay for it. Everything that *looked* alive on the DEAD TREE was to stay. Foot on ground. Unmovable force.

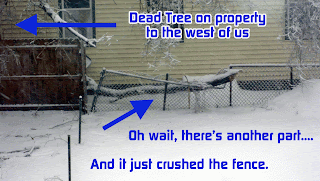
This morning at 7:15 Am, I heard a loud crack.

I took these pictures.

Another one bites the dust.

I have never been so thankful for not having put up our new wooden fence yet.