Friday, May 21, 2010

Covington pushes rehab property program

Looking into getting a wonderful historic home in an up and coming neighborhood cheap?

Covington pushes rehab property program
COVINGTON - Covington has started using its $5 million federal grant to rehab foreclosed properties and wants more people to take advantage of the program.With some of the $5 million Neighborhood Stabilization Program grant, the city in January began offering down payment assistance for people to buy foreclosed property in the city's urban core. The city last week decided to offer down payment assistance citywide to encourage more people to use the program this summer before the September deadline for the city to use all the grant money. (more at the link below)

Covington pushes rehab property program

Posted using ShareThis

This is very exciting. It's going to rapidly and dramatically transform West Side, near Seminary Square. Don't forget, if the property is in the Arts District, it could qualify for an additional $6,ooo grant.

If you are interested, but need guidance or advice, feel free to contact us. Also, the home linked below and to the right is still available. 1800sq', yard, offstreet parking. just a few blocks from I-75 and Main Strasse and just a few feet from Seminary Square.

Great House for sale, CHEAP!

Thursday, April 15, 2010

Kitchen tile job grout....done.

I just realized I hadn't updated the kitchen grout tile situation. Sorry to leave you hanging there (following up on this blog post and this blog post).

It did take us a while to find the right grout colour. We decided against the sanded grout, as it looked too rustic against the smooth shiny tiles. It just wasn't right. And we wanted it greener than what we had tried before. Mixing the 2 sanded grouts together gave us a greenishness, but the tan just muddied the outcome after it dried and the texture made too many shadows.

So we went from tile store to tile store, carrying a sheet of the tiles with us, trying to find the right match. I highly recommend bringing the tiles AND experimenting in different lights. We discovered very quickly that some colours looked great in fluorescent light or natural light, but looked awful in xenon or halogen, which is what we'd have.

Then we found our colour. It was perfect. But, unfortunately for us, it was, of course, discontinued and they had just enough left to do our project (maybe). This meant, if we ever had to do a patch, we would have to mismatch the grout, or redo the whole kitchen. It was also very, very expensive.

As much as I love finding the right colour, I'm not taking the risk of not having a backup if something happens. This is just too big of a job to have to do over. We kept looking.

Then we found a non-sanded grout which was, in the end, every bit as good. DH couldn't distinguish it from the more expensive, discontinued grout.

The interesting thing about this stuff was that you can mix it with water, but you could also mix it with something called 'grout booster' which basically turns your unsanded grout into a grout-stain-resistant-resin that never needs to be sealed.


Oh, I was so there.

So we bought 2 boxes of the grout, 2 containers of the grout booster, and started blue taping off the edges of the tile, on the wall and on the counter top, getting it ready to grout.

That took 2 hours.

The one thing the salesman told us before checking out at the tile store was to never never never mix partial grout and partial grout boost, but to mix the whole batch, all at once. He said it was very important, because sometimes if you don;t get the mix just right, the different batches (even if from the same container) can be blotchy if you mess up the measurements.

But he also said that the grout set up time with the Booster was about 60 minutes.

I thought to myself, "No %$*%#@ way am I going to get all of this grout up within one hour. No way."

So I completely ignore the nice young man at the tile store and brought out my postage meter. I weighed the box of grout, emptied the box, then weighed the empty box. I weighed the bottle of booster and then weighed the empty bottle.

I subtracted the weight of the empty containers from the full containers, divided by 2, then put my mixing bucket on the scale, reset the scale to zero, then added half of the dry grout weight, then added half of the liquid. Viola. Perfect to the gram.


And I will tell you this: Now that I am done, I could NOT have possibly grouted that entire kitchen in two hours. In the end, it took me 6. If I had done the whole thing in 2 batches instead of 4, I would have wasted a lot of grout, and I'm pretty sure it would have looked worse than blotchy.

And the grout was expensive. It cost more than the tiles. Not as much more than the first choice, but more. Still, I'll never have to seal them, and we didn't have to compromise on color or texture, which, I thought was a good trade off along with the stain resistant factor.

Once the mix was ready to go, (I just hand mixed it, no need for the 1/2" grout paddle and the cordless drill on this one) I just scooped up a bunch of the grout, slapped it on the tiles and started working it into the little cracks with a grout float. This is why it took so long. There were a lot of cracks, and I didn't want the grout to get dry or look 'chunky'. It's also more than a little tricky getting into those cracks up under the cabinets. There's just not a lot of room to work (DH Hint: Don't be afraid to use your hands in tight places. A rubber glove helps.).

After waiting 30 minutes, the crew (DH and our friend J) came in behind and started the cleanup with the damp sponge while I kept working forward around the kitchen. They spent a lot of time getting the tiles clean while not gouging out the grout. It was not the easiest job we'd ever done but it wasn't the hardest.

It was a little nerve wracking knowing that you have a limited amount of time to do a process and you can't stop once you start.


This was the last stage of the grouting, and we had JUST ENOUGH mixture. None to spare, and zero leftovers. We were lucky...


After the tiles has been primarily buffed clean, we then removed the blue tape. I did not want the grout to dry hard behind it so that when I removed the tape it could crack the edge grout. It was still pliable when the tape came off.


A few more hours over the next few days of buffing tiles made the little suckers really shine.


To meet the backsplash and the counter, we sealed a bit of 1/4 round trim with the same stuff we treated the counter tops with, mitered the corners, and set the trim in on top of some anti-bacterial kitchen sealant/adhesive, then weighted it down with tape and various heavy stuff until it dried. This trim hides any irregularities in the wall or counter and then politely disappears.


Then we put the side panels back on the upper kitchen cabinets (that we removed in order to tuck the tiles in behind) and had a glass of wine. (DH: If you enlarge the photo, you can see the ingenious "copper" switchplate solution created by DW.)

Job done. Yay! (Thank you, J!)

Garden Quiz?

Or, "What the hell is this in my garden and is it a weed?"

Realistically, this is the first Spring this garden has seen. Last year it was a hodgepodge of throwing down seeds and wondering what would grow and when. Sometimes it would take 2-3 months after having given up on something and then a seedling would sprout and I'd have to play the guessing game of 'what germinated'?

When looking for pictures of plants online, everyone loves to give the picture of the full blooming whatnot, which is just too easy. For me, I want to know what the heck it is before I fertilize a weed, or pull that echinacea seedling by mistake. So here's my attempt. Some of these I'm pretty sure of, some I haven't a clue, others I just brain cramped on.

I'll come back to this page as the days progress, perhaps with updates, before and after pictures, to help you identify whats growing in YOUR garden. Oh yeah, and I'll be using it as a reference for next year, too.

here goes:


OK, let's start off with one I have no idea what it is. The stuff in the middle of the picture grew to be a bush about 6 feet tall with lots of yellow flowers. The bees loved it. So will my neighbors. That's where I moved it to right after taking this picture.

The thing on the bottom right, I believe is a coneflower.


Russian Sage


Purple Flox


California Poppy (Big orange blossom)


Oregano


Hodge Podge of Idunnowhat


Brainus Crampus ( DH: I have no idea what this is and I don't think I ever knew! )


Self-seeding Mondarda (bee balm, big red crazy flowers)


Lemon ___________. (DH: That's Lemon Verbena )
(Smells wonderfully like lemon peel)


Jacob's Ladder


I bought this at Findlay Market, wrote down what it was, then promptly threw away the paper.


Emerging Hosta


Hollyhock seedling


Adolescent Hollyhock


Grape Hyacinth


Garlic crop (yay!)


Evening Primrose


Delphinium


Coral Bells


Coneflower, I think.


Columbine


Cilantro. (I cheated, I looked at the label.)


Celadine poppy (already has tons of yellow flowers on it)


Campanula (pink & white bells. Self seeding; so many that I repotted the extras for neighbors)


Chamomile


Day Lilies, Irises, lamb's ear, Stelladoro lilies, flox, daffodils, and a bucket.

There's more. And it's growing SO FAST!!!
I love the Spring.

Craigslist: you can find good deals, and then you can find this:

Sometimes you just gotta wonder what the hell these people think a used kitchen is worth.
I know they're trying to make a buck, but $28,000? "OVER $28,000?"

Is that 28,000 pesos?

EDIT: 4/30/10 They've dropped the price.

BUSINESS IS CLOSED AND WE ARE SELLING THIS FINAL KITCHEN DISPLAY. IT RETAIL FOR $28,000 AND FINAL PRICE IS NOW $6,000. INCLUDES SOAP STONE SINK, GRANITE COUNTERTOP. IT IS 10 FEET IN LENGTH ON SINK SIDE AND 7 FEET ON HUTCH SIDE. FOR MORE INFO. CALL STEVE @ 937-829-9696.

For $6K, I'm in.
Bur seriously, who pays full retail these days?


Friday, January 29, 2010

Kitchen tile job grout....gone astray.

Yes, I said I'd stop tiling about halfway up the kitchen wall behind the stove... but then I remembered the immortal words of DH shall now and forever continue to haunt our halls... "(note from DH: Yes, she is fully prepared to tile the whole darned wall up to the ceiling. Trust me.)"

Alrighty then... if I'm prepared, might as well just do it then, eh?

It added about $130 to the budget to add an additional 25 square feet above the stove, but after thinking long and hard about it, I think it really would just look like a half-arsed job if we didn't take it all the way to the ceiling.

So first things first, after removing the side cabinet and the side panels from the upper cabinets (so I can tuck the tiles underneath like I did at the sink) I thought it would be most important to get a line behind the stove from where the tiles to the left of the stove stopped... over to the right side of the stove. This would be my horizontal line that all the other tiles would have to match.

Thankfully, we hung the cabinets straight and at right angles, so I didn't have to worry about us not having 90* angles for the square tiles. (But I measured with a square, just in case before I got started.)

Once I drew my base line, I could start applying mastic to the wall, starting from where I left off on the right, keeping the spacing and all that jazz.

Then came a decision: Tile behind the oven vent hood, and if so, by how much?

And my thought was this: Let's say in 2 years, I chuck a travel coffee mug at DH because he continually sneaks spoons and forks into non-silverware drawers in the kitchen. He ducks, the mug dents the hood, and there I am needing a new vent hood and a marriage counselor.

If I keep the DH, but replace the vent hood...well, if I don't tile now as much as I can, there's a likelihood that a new vent hood won't have the same shape/size, etc. and tiles will need to be added, as will grout, and the grout will have to be matched, blah blah blah.

So yeah, take the vent hood down and tile under the whole darn thing.

Frankly, it was a lot less work taking down the vent hood and tiling everything behind it, because otherwise I would have been doing some funky small cuts, and it still would have been a PITA to grout behind it.

In the end, it was the rational decision.

But, hey... note the small electrical plug up there on the wall? That's going to stick out like a sore thumb as soon as you walk in the door. Yes, I'm planning on spray painting the hammered copper spray on the plate, but what about the plug? It was stark white.

We wanted the plug up there in case at some time down the road we wanted to change our lighting options and maybe need to plug in a transformer, but for the life of me, we've never used the darn thing. My concern with spraying the plugs at the counter level was that as we used the plugs, it was likely the paint would scratch off from use, but in this case, that's hardly likely.

So here's what I did....

I made a template of a plug, cut out some holes and spray painted the plug.

Like a moron, I came up with the idea AFTER I had tiled around the plug, so I couldn't just willy-nilly spray all over the place. You see, if you have 2 brain cells to rub together, you think of this BEFORE you tile. Yeah.


Anyway, it came out rather well, no fuses blown (yay!) and with the copper painted plate over top, it's invisible.

Oh yeah, btw, as I tiled up the wall, I kept a 3' level nearby. Every few squares of tile I put up, I would check to make sure my lines were still going up level and plumb. You'd be surprised how easy it is to slip and move your tiles into a 1/2" downslope over a 6' span.


A few hours later, I was done and we put the vent, stove and cabinet back into place and made dinner.

The photo does not do this tile justice.

It looks so much better than I expected.

Of course, there were still minor adjustments to make. For example, in one line of tiles just above the stove, a whole column of tiles were a little offset. I just cut straight through the mesh and the mastic, pulled the whole column out and readjusted it.

There were also several squares that were tilted a few degrees of of acceptable, and a razor blade and a dollop of mastic set those right as well. Just don't be afraid to cut into the mesh and redesign as necessary.

Like when I was tiling into the counter corner, and I needed to change the spacing to meet the wall with a solid line of squares, just figure out how far back you need to make the spacing adjustments and spread out the rows/columns to make transitions occur smoothly and undetectably. If your cabinet/ceiling angle isn't 90*, you can take the same approach. It will take longer, but it will look better in the end.


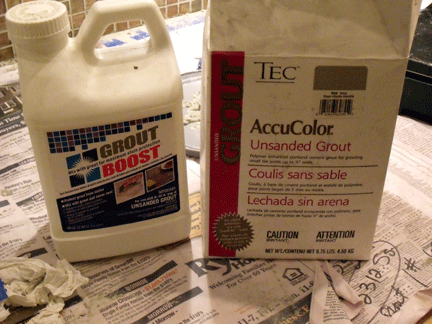
Oh, and we've made some changes regarding the grout.

We are NOT going to use the mixed grout we tested previously. We have decided that although the gaps between the tiles are large enough (1/8" apart) to use sanded grout, we just didn't like the texture in the end. The gritty look of sanded grout didn't blend well with the shiny coppery tiles. We're going to go with a lighter green non-sanded epoxy grout... one that won't need to be re-sealed every year like the sanded grout.

Here are the problems:
1. We have 38 ft^2 of tile to grout.
2. Epoxy unsanded grout does not come in the same colors as sanded grout.
3. Sanded grout costs $18/bag would cover our entire area
4. Epoxy unsanded grout costs $90/bucket and would cover about 18 ft^2
5. We found the perfect color.. #13 lichen, but it's discontinued.
6. Did I mention that the unsanded epoxy grout would cost as much as the tile itself did?

And what if we had a plumbing or electrical problem and we needed to punch a hole in the wall... you can't regrout with a discontinued grout colour... where would you get it?

So the search continues for the perfect grout.

This could take a while.

Friday, January 15, 2010

Installing Ikea Curtain Rod and Custom Curtains

It's January. It's cold out.

I can't tell you how thankful I am that we sprayed in the foam insulation before we put up the drywall... but there's more you can do to control the heating of your home. Considering that heating costs are on the rise, and we don't have zoned heating, I wanted to keep all the warm air coming from the first floor from rising all the way up to the third floor via the open stairway, especially when it's evening and we're snuggling on the sofa watching a movie.

I purchased some good thick upholstery fabric that matched the carpeting, took a few days over the holiday break, and sewed me up some custom curtains. Figuring out how to sew the curtains was in itself a major project, and if anyone cares, I'll post details on how I did it. Note that I did not say 'how to do it' because, well... I was flying by the seat of my pants on that project. 110" long curtains out of four 60" wide panels that spanned 100" long with pleats. Ugh. That's a lot of thread.

The key to this project was again, my love of all things IKEA. Ina word: Kvartal.
We saw the picture above in the catalog and thought it would work perfectly for us. All we needed was 2 track lengths, some do-hickeys to attach the track to the ceiling at the joists, some sliders to fit in the track, and the hangers.


It's actually a very cool set up, but what isn't from Ikea?

The sliders and the pleat hooks came in a separate box. We bought 2, but really didn't need them all.

So, getting started... finding the joists. You'd think this would be an easy thing, wouldn't you? In a second word: No.


Back in September, 2008, when we were prepping for the drywall, we mentioned that we installed a few hundred 1x3 slats as firring strips perpendicular to the floor joists on the ceiling on the first floor. This was to even out the wobbly joists and give the drywallers more surfaces to nail to. It also helped position the can lights right where we wanted them to be.


This picture above is of the livingroom before the drywall was installed.

So here's the point... using a stud finder... which one of the *@#$^*%! beeps is the real joist and which is a firring strip, eh?

Here's the ceiling area we wanted to run the track on:


And here's how many holes we had to drill in order to locate the real joists:


Looks like someone came in with a tommy gun and shot the place up.

I don't know why it was so difficult. Every time we drilled a new hole and there was just air behind it, we'd look at each other and start mumbling about the insanity of the joists not being evenly spaced apart.

Once we found the real joists and spackled up the holes, we installed the attachments that connect to the track. These little hanger nuggets are just so cute.

The copper part is the part that attaches to the top part of the track.


We went with six hangers, because the fabric is so darned heavy, I didn't want the weight of the fabric to warp or bend the track. Turns out it's a pretty well designed track and I didn't need to worry, but why pass up an opportunity to do a little overkill.


Once the track was cut to length and assembled, it was an easy install with screws to the little hanger-nuggets. Then we installed the sliding hangers into the hanging side of the track, inserted the curtain hangers into the pleats of the fabric curtains, then hung them up.


Now we just pull the curtain closed in the evenings, shut the vents on the third floor, and we're in snuggle city.

UPDATE:

Here's the curtains hanging from the inside of the track. What I did is to first fold the fabric down from the top about an inch, and sewed it in place. Then I folded the top down again about 5", and sewed it where the top fold met the fabric, creating a 5" 'loop at the top.

I measured this loop placement very carefully because I wanted the curtain to be right at the top of the ceiling. The whole purpose was to not let hot air rise, so I wanted it as close as possible without rubbing the ceiling paint off. This determined the loop height. I measured from the bottom of the plastic hanger in the track to the ceiling, then added the height of the metal curtain hanger. That was the height of the loop and the location where I needed to sew all the way across.

Your results may vary :-)


Then I measured the width of the wall opening at the stairs, and measured the fabric length (which turned out to be about twice the length of the opening (just lucky I guess as I had this upholstery fabric lying around for a wingback chair reupholstering project that never occurred.)

Fabric length - opening length = folded fabric measurement

Once I knew the folded fabric length it was just a matter of determining what I wanted the folds to look like and how many I wanted. (i.e. if I had 100" of fabric to fold, I could have twenty 5" folds, or forty 2.5" folds.) Then I just spaced out where the folds needed to go and sewed the folds in place.


Then once everything was sewn together, I inserted the hook up into the backing underneath the top fold, and viola: Curtain.


I hope this helps!